Introduction
I started this journey looking for a means to create a blog, in an OS X and iOS centric environment, that didn’t involve using Wordpress or having to edit HTML directly (if I could help it.) That lead me to finding Octopress and in order to use Octopress I discovered Markdown and git. In this blog post I describe the processes I have for creating, editing, deploying, managing and controlling content for my Octopress blogs. I have a couple blogs that I use Octopress for, and a number of platforms I want to create content on, so the investment in creating scripts and infrastructure has been worthwhile.
Content creation
I use Byword to create my blog posts. On my Mac I use Byword to create and edit the material with Marked rendering the content continuously in its window to the side of Byword. On my iPad I simply use the Byword native application.
Draft Blog Posts
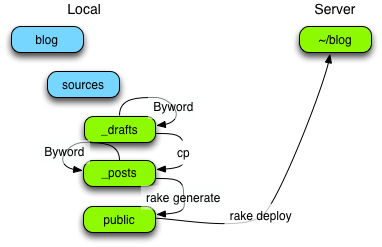
I have setup a _drafts folder in sources and use the rake new_draft command to create these drafts. This allows me to create draft blog posts which will not be deployed on to the blog even if I do create and deploy other new content. See Dennis Wegner’s blog post on how to set up the _drafts folder and the associated rake new_draft command.
However if I start a blog post on my iPad I can’t run rake new_draft or rake new_post so I just start writing. Then when back at my Mac, I copy the material over into an empty new_draft or new_post file.
rake new_draft[“my new draft”]
cat blog_content.md >> 2013-05-25-my-new-draft.markdown
Content rendering
While writing on my Mac I render the content using Marked. When ready for posting, the blog post is rendered into HTML using the Octopress rake generate command. I then use rake preview to allow the blog to be viewed in a browser locally before deployment.
When previewing a site that is not at the web root, for example http://www.example.com/blog make sure the local browser URL is: http://localhost:4000/blog.
Content deployment
Once the blog post looks okay I then deploy the blog using the Octopress rake deploy command.

Blog Creation, Editing and Synchronization With An iPad
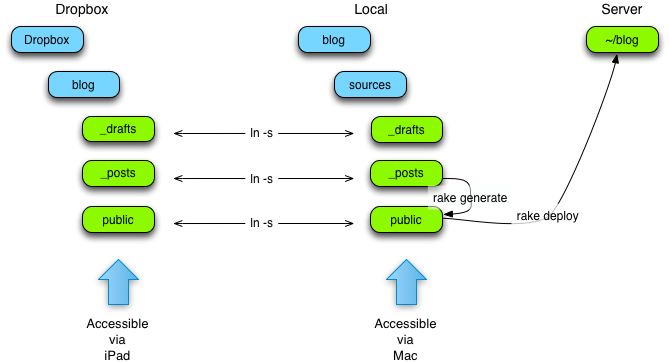
As mentioned earlier, I also use my iPad to create and edit content. I use Nebulous and Byword on my iPad to edit Markdown content. Byword is able to use iCloud and Dropbox for the storage of content. I use Dropbox to keep my blog post content synchronized between my iPad and my Mac. In order to do this, first I create a Dropbox folder that corresponds to the blog within the Dropbox folder on the Mac. Then in this Dropbox folder I create three soft links to the corresponding _drafts, _posts and images folders in the blog’s sources folder.
cd ~/Dropbox
mkdir blog
cd blog
ln -s ~/Sites/blog/source/_drafts _drafts
ln -s ~/Sites/blog/source/_posts _posts
ln -s ~/Sites/blog/source/images images
The folders within the Dropbox can then be accessed from the iPad. The sequence for creating / editing content is:
- Create the post in either _drafts or _posts folder on either the iPad or Mac;
- Edit on either device;
- When ready to post, use the Mac to render and deploy the blog.

Content Management and Configuration Control
Given Octopress’s use of git for development and distribution it is not surprising that I use git for configuration control of all of the blogs on my Mac. There are a number of aspects associated with my git setup that are discussed here: git tools; git branches; and git server.
I either use git at the command line and/or use SourceTree to manage the git repository. SourceTree offers a nice graphical representation of the respository(ies) and the commits within them.
I have adopted the gitflow branching philosophy and structure, so I have a master and a develop branch, and I can create feature branches as needed. While this can all be done from the command line, SourceTree has a nice command to set this up for you and makes it very easy to use. This is how I typically use the gitflow branch structure when creating a blog post:
- Checkout the develop branch;
- Create/edit new blog post;
- Generate & preview blog;
- Repeat 2 & 3 until satisfied;
- Checkout the master branch;
- Merge in the develop branch;
- Generate & preview blog;
- Deploy blog.
SSH-based Git Server
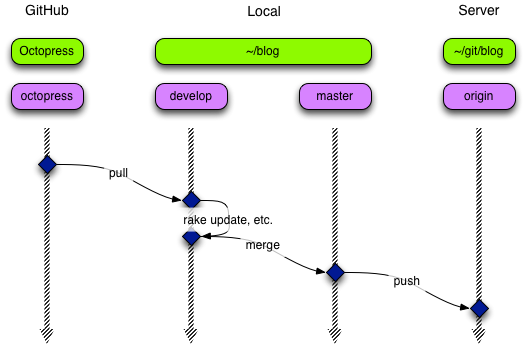
The default arrangement is for Octopress’s GitHub repository to be the git origin. I suspect for most people this is okay if they are just using a single local machine. However in my arrangement I want to sync my blog repository between my Mac and my MacBook. So I created my own SSH-based git server on a remote host. This means my origin is now my git server and not the Octopress GitHub repository. I (imaginatively) renamed the Octopress GitHub repository octopress. To enable this I created a Bash script that I run when I first set up a blog. The script is:
#!/bin/bash
# taken from
# http://casperfabricius.com/site/2008/09/21/keeping-git-repositories-on-dreamhost-using-ssh/
#
# with modifications provided from
# http://linuxmoz.com/git-tutorial-how-to-use-git/
#
# and modifications and explanations from
# http://stackoverflow.com/questions/658885/how-do-you-get-git-to-always-pull-from-a-specific-branch
#
# $1 path to git repository to be cloned
# $2 name to be given to local clone and directory name
# $3 name to be given to original cloned respository instead of origin
YOUR_GIT_DOMAIN=user@example.com
#
# clone git respository
#
git clone $1 $2
#
# don't create and initialize the local git respository as git clone has created it...
#
cd $2
#
# As we are working from a cloned git repo you need to change the origin name to something else
# echo "git remote rename origin old_origin"
#
git remote rename origin $3
echo "As we are working from a cloned git repo we have changed the original origin name to '$3'"
#
# create remote git respository and set as the origin
# added full path to git repository on server
#
ssh $YOUR_GIT_DOMAIN 'mkdir -p ~/git/'$2'.git && cd ~/git/'$2'.git && git --bare init'
git remote add origin ssh://$YOUR_GIT_DOMAIN/home/user/git/$2.git
#
# set the new origin as the default branch
#
git config branch.master.remote origin
git config branch.master.merge refs/heads/master
git add .
git commit -m 'Created new repo'
git push origin master
echo "Your new git repo '$2' is ready and initialized at $YOUR_GIT_DOMAIN/home/user/git/$2.git"
So an example of using this script to create an Octopress-based blog called my_blog and rename the Octopress origin to octopress is:
this_script git://github.com/imathis/octopress.git my_blog octopress
This script is based on the posts by Casper Fabricius, LINUXMOZ and this Stackoverflow article.
My day-to-day blog posting proceeds as normal. When I want to push the blog to the git server I just push to origin. When I update I now just pull from octopress.

Updating Octopress
With my git server arrangement, this is how I update my blog to keep in step with Octopress development:
- Checkout develop branch;
- Pull Octopress from GitHub;
- Run
rake update, etc.; - Generate & preview blog;
- Checkout master branch;
- Merge develop branch;
- Generate & preview blog;
- Deploy blog;
- Push blog to origin.
To work on the other machine I simply pull the blog from origin (on my Git server) onto the other machine.
