[ This is a reposting of my teaching blog post previously hosted on http://users.ox.ac.uk/~coml0454.
NOTE: I no longer teach at University of Oxford and this is a description of how I used to teach the course.]
Summary
These instructions describe how to access Autopsy running on the FOR2014 Elastic Compute Cloud (EC2) instance used for the FOR classroom exercises. This post describes:
- How to configure Autopsy on an Amazon Web Services (AWS) EC2 instance to use its default port from a specified remote host public IP address.
- How to configure Autopsy on an AWS EC2 instance to use ssh Port Forwarding to authenticate the connection and encrypt the traffic between Autopsy and the remote host.
Background
The FOR course has exercises that allow the students to use cloud computing resources to perform forensic analysis. The exercises use AWS resources. In the exercises the students use the Linux command line and Sleuthkit to investigate and analyze forensic evidence. By hosting the exercises on AWS the students experience first-hand the flexibility offered by cloud computing resources.
The instructions Creating and Accessing the FOR2014 EC2 Instance for the FOR Course detail how the students should create the FOR2014 EC2 instance from a customized Amazon Machine Image (AMI). Alternatively the post Setting Up Sleuthkit and Autopsy on an AWS EC2 Instance describes how to create a EC2 instance that includes the Sleuthkit and Autopsy software.
Introduction
Autopsy is a web browser-based front-end to the Sleuthkit tools. Autopsy also logs the actions performed by the user to provide documentation for future reference.
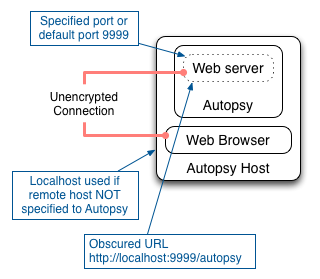
Autopsy runs its own web server on the host and allows connections from a web browser through a specified local port. If a port is not specified, the default port for Autopsy is 9999. Autopsy does not authenticate the user connecting to its web server. Nor does Autopsy encrypt any traffic between the web server and the web browser.
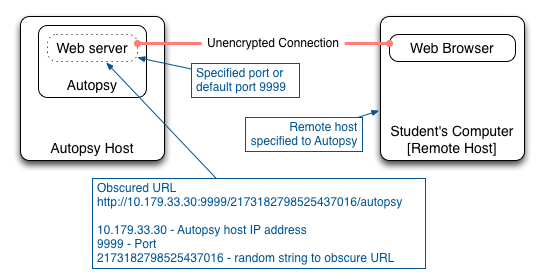
Note: Autopsy refers to the computer accessing Autopsy as the “Remote Host” because it is remote from Autopsy. So in these instructions the “Remote Host” refers to the local computer that the student is using to access Autopsy on the FOR2014 instance.
Autopsy provides some simple security features:
- The public IP address of the remote host that will access Autopsy can be specified when Autopsy is launched. Autopsy will only allow access to web browsers from that remote host public IP address.
- Autopsy provides an obscured URL that includes a random string.
- If a remote host IP address is not specified then Autopsy will only allow access from the localhost.
Setting Up A Standard Autopsy Configuration
This section describes how to access Autopsy when it is hosted on the FOR2014 EC2 instance. This description uses the standard Autopsy security features.
Setting Up The Security Group And Firewall
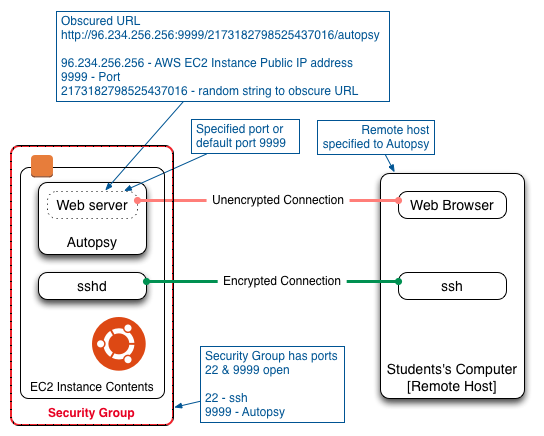
For Autopsy to be accessible the Security Group and the firewall must have port 9999 open. Because our FOR2014 instance also has to be accessed using ssh the Security Group and the firewall must also have port 22 open. ssh gives command line access to the FOR2014 instance so that the instance can be used and Autopsy can be started and stopped.
Setting Security Group
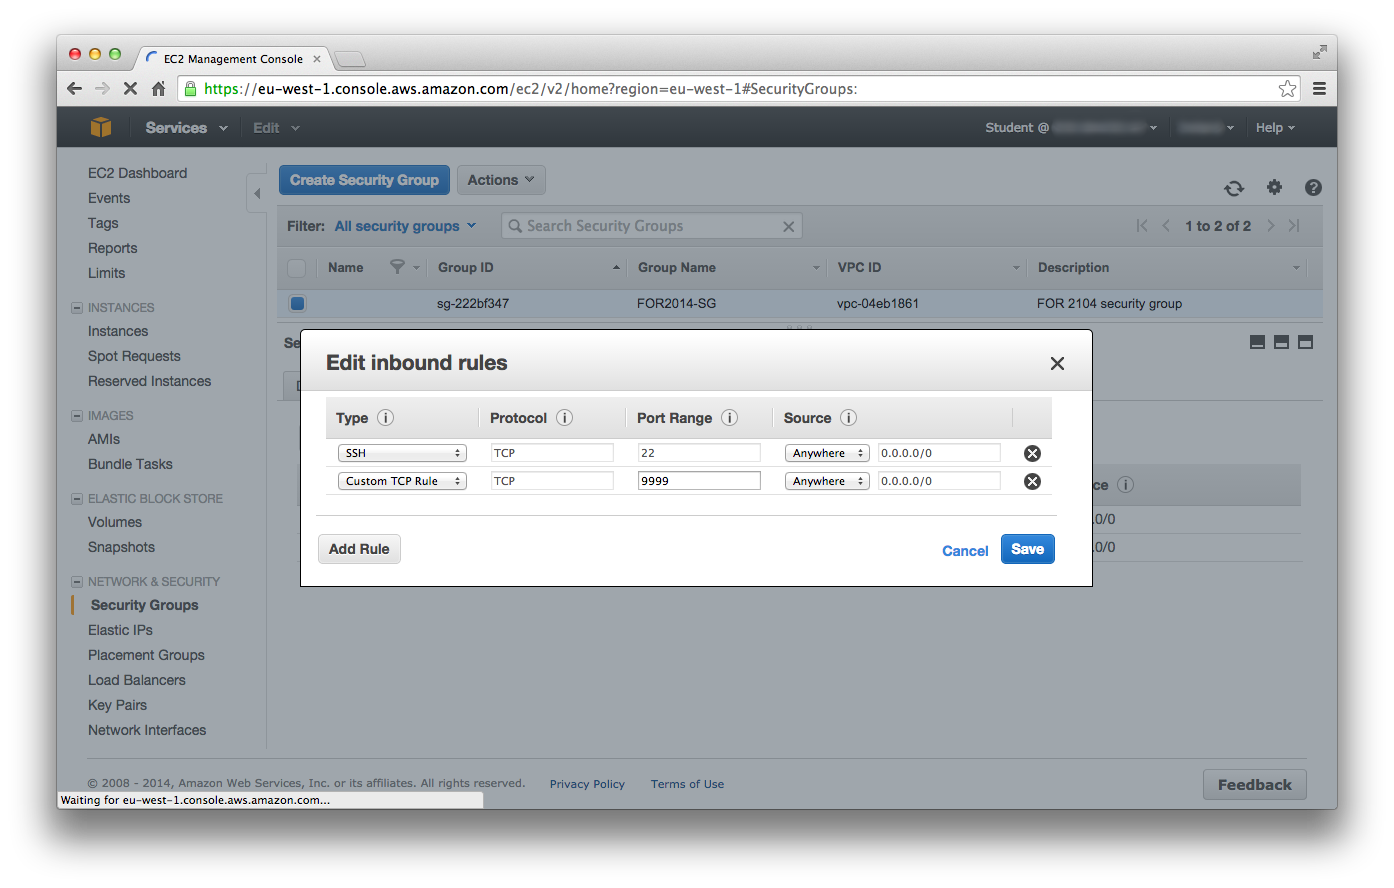
Log into the AWS EC2 Management Console and select the Network & Security -> Security Groups tab. Choose the Security Group that is used by the FOR2014 instance that will run Autopsy. Select Edit inbound rules from the Actions drop down list. Add a rule, Type = Custom TCP Rule, Protocol = TCP, Port Range = 9999, Source = Anywhere. (Make sure that the SSH rule is not deleted.)
Setting ufw Firewall
Start the FOR2014 instance and log in via ssh. Check the status of the ufw firewall using:
sudo ufw status
The firewall should be active and have a rule allowing ssh access. Add a rule to allow access to Autopsy:
sudo ufw allow 9999
Check the status of ufw to ensure the rule has been accepted.
Running Autopsy In A Standard Configuration
Get the public IP address of your local computer at the command line by running:
curl ifconfig.me
Or in a web browser by going to:
http://ifconfig.me
Then start Autopsy on the FOR2014 instance, providing the public IP address of your local computer, by entering the following on your FOR2014 instance:
cd ~/autopsy
./autopsy <LOCAL_COMPUTER_PUBLIC_IP_ADDRESS>
Autopsy will start running and provide a URL in the form:
http://ip-10-179-33-30:9999/17056224493964228197/autopsy
However “ip-10-179-33-30” is the private IP address of the FOR2014 EC2 instance. Modify the URL to use the public IP address of the FOR2014 EC2 instance and keep the Autopsy provided sub-site address, to create a URL in the form:
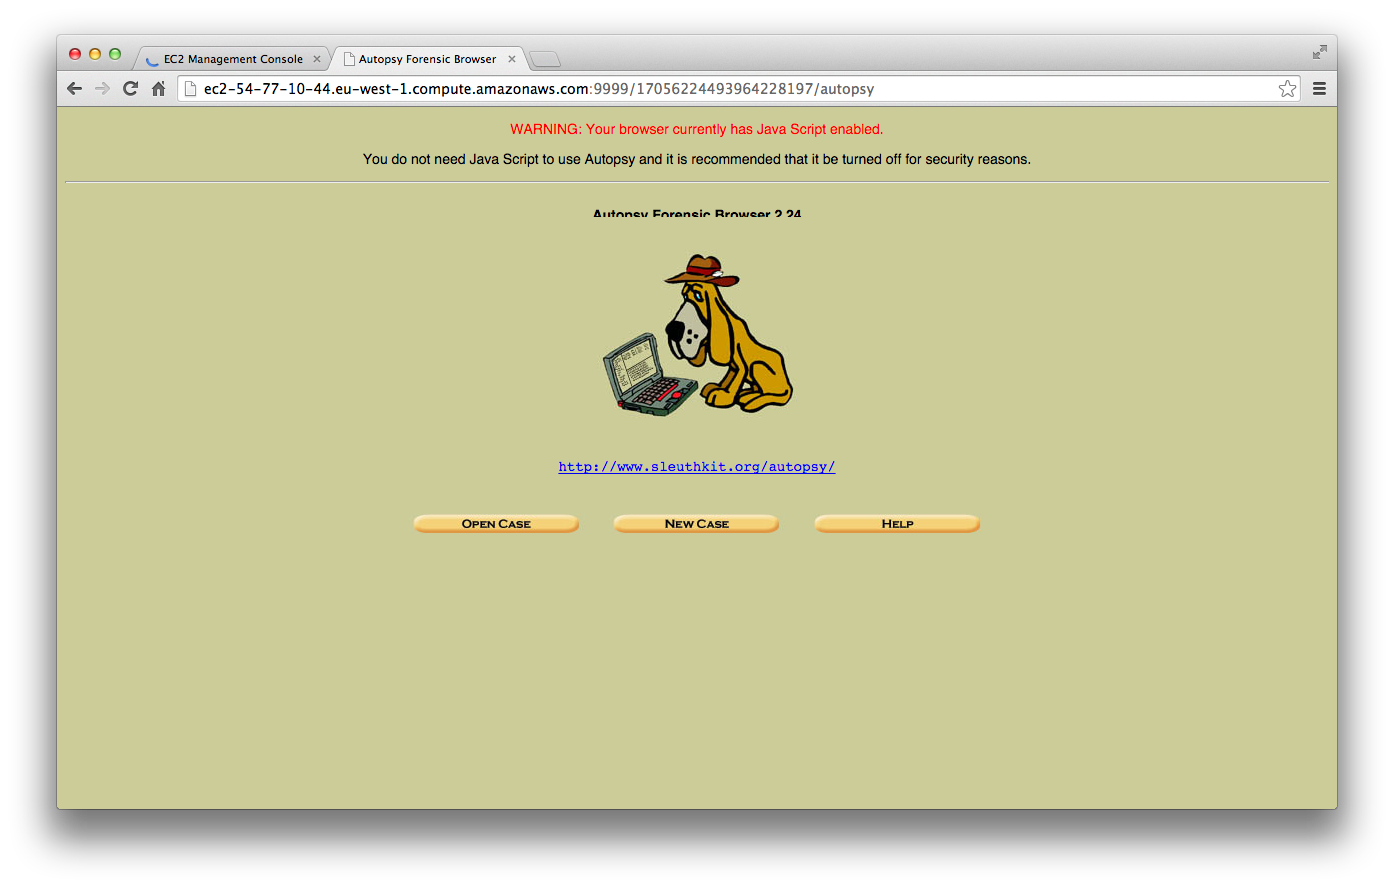
http://ec2-54-77-10-44.eu-west-1.compute.amazonaws.com:9999/17056224493964228197/autopsy
The public IP address of the FOR2014 instance can be found on the Instances page on the EC2 Management Console.
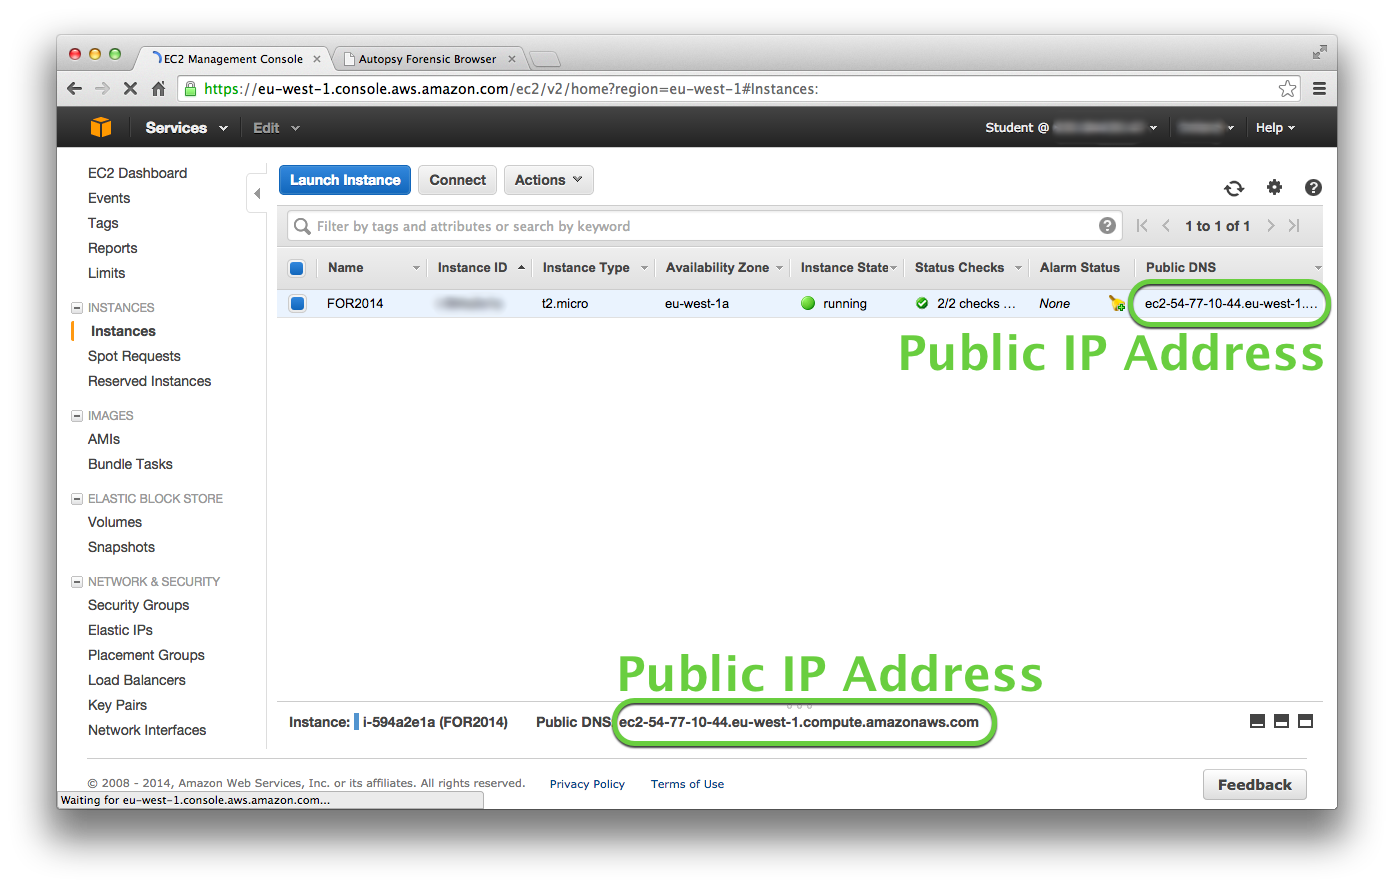
Now use the modified URL in the web browser on your local computer to access Autopsy on the FOR2014 instance.
Setting Up Autopsy With ssh Port Forwarding
The remote host IP address is a public IP address, so any computers on the private network behind that public IP address will get access to Autopsy if they use the correct URL. The use of a random string to obscure the location of the Autopsy connection can help prevent other computers on the private network from accessing Autopsy. But security through obscurity is not a complete solution. In order to provide a more complete security solution, this section describes the use of ssh to authenticate the user connection to Autopsy and encrypt the Autopsy traffic. The technique described here uses ssh Port Forwarding.
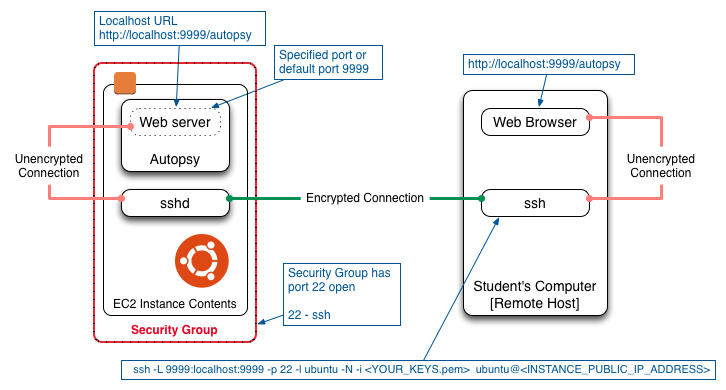
On the FOR2014 instance run Autopsy in the form:
cd ~/autopsy
./autopsy
Then on the local computer run ssh to forward port 9999 to the FOR2014 instance, for example:
ssh -L 9999:localhost:9999 -p 22 -l ubuntu -N -i <YOUR_KEYS.pem> ubuntu@<INSTANCE_PUBLIC_IP_ADDRESS>
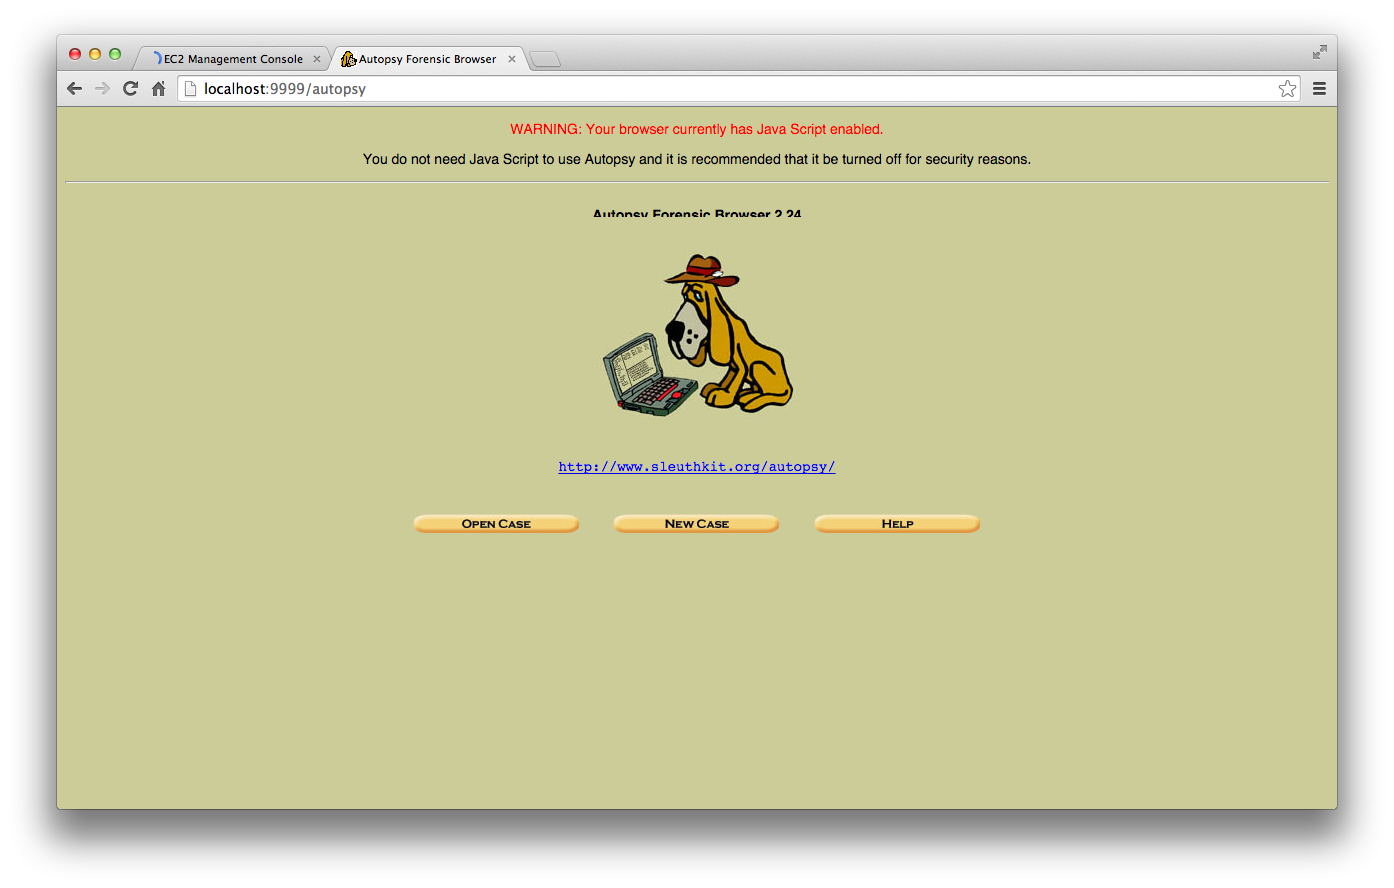
Then use your local web browser to go to the URL:
http://localhost:9999/autopsy
Remove the FOR2014 Security Group and the ufw firewall rules allowing port 9999 if you intend to use ssh port forwarding.
Using screen
In the examples above, Autopsy is being launched from the ssh command line. If only the ssh terminal command line is used, the user cannot log out of the FOR2014 instance without terminating Autopsy. To allow Autopsy to continue running after the user has logged out of the FOR2014 instance the screen utility can be used. screen allows terminal sessions to remain running even if the user is no longer logged in. NOTE: screen uses the Ctrl-A key as a Meta key to enable commands to be given to screen while it is running. To run Autopsy on the FOR2014 instance using screen, log into the instance using ssh and then enter:
screen
cd ~/autopsy
./autopsy
Then type Ctrl-A d. [The Ctrl-A key followed by the “d” key.] This will detach from screen and return you to the original command line. You can now logout from the instance by typing:
logout
To shutdown Autopsy, log back into the instance using ssh and then:
screen -r
Then type Ctrl-C. [The Ctrl-C key.] This will terminate Autopsy.
exit
This will terminate the screen session and return you to the original command line.
Reference
http://manas.tungare.name/blog/ssh-port-forwarding-on-mac-os-x/
Additional Posts
I have written additional posts that give more detail on the different aspects associated with using the AWS environment for my particular course. In the Using Amazon Web Services in Teaching post I give an overview of the AWS environment I created for my course, shown in the figure below.
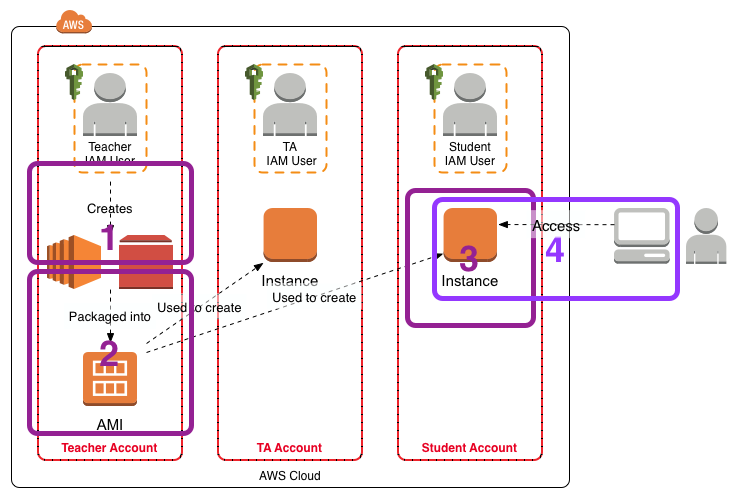
- In Setting Up Sleuthkit and Autopsy on an AWS EC2 Instance I describe how I create a master EC2 instance that holds the software and data for the exercises.
- In Creating an AMI for Classroom Use I outline how I created an AMI for sharing with the students.
- The instructions Creating and Accessing the FOR2014 EC2 Instance for the FOR Course detail how the students should create an EC2 instance from the AMI.
- [This Post] The instructions Accessing Autopsy v2 on the FOR2014 EC2 Instance detail how to configure Autopsy on the FOR2014 EC2 instance for access from the student’s local computer.