[ This is a reposting of my teaching blog post previously hosted on http://users.ox.ac.uk/~coml0454.
NOTE: I no longer teach at University of Oxford and this is a description of how I used to teach the course.]
Summary
These instructions describe how to create an Amazon Web Services (AWS) Elastic Compute Cloud (EC2) instance from a customized Amazon Machine Image (AMI) for the FOR classroom exercises. The instructions also provide information on setting up an ssh session to log into the instance once it is running.
Background
The FOR course has exercises that allow the students to use cloud computing resources to perform forensic analysis. The exercises use Amazon Web Services (AWS) resources. In the exercises the students use the Linux command line to investigate and analyze forensic evidence. By hosting the exercises on AWS the students experience first-hand the flexibility offered by cloud computing resources.
Introduction
The AWS-based FOR classroom exercises will use an AWS Elastic Compute Cloud (EC2) Instance. AWS provide a video describing AWS EC2 instances. It can be found at https://aws.amazon.com/training/intro_series/.
Creating the FOR2014 EC2 Instance
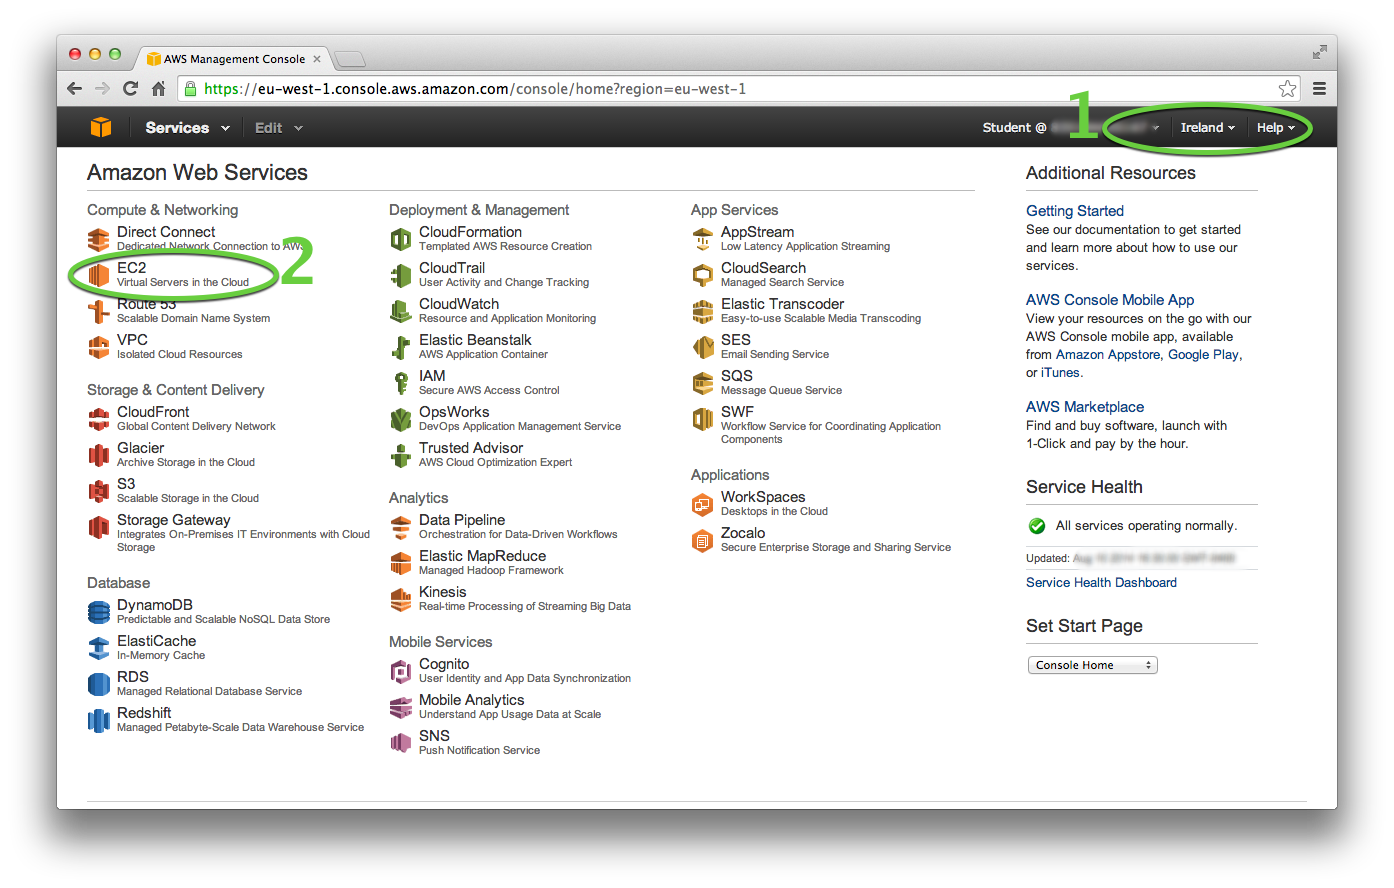
The FOR classroom exercises use a customized Amazon Machine Instance (AMI) to create the EC2 instance for the exercises. Log into your AWS IAM User account using a web browser. The URL will be in the form: https://{AWS Account ID}.signin.aws.amazon.com/console
- Select Ireland (EU-West) as your region.
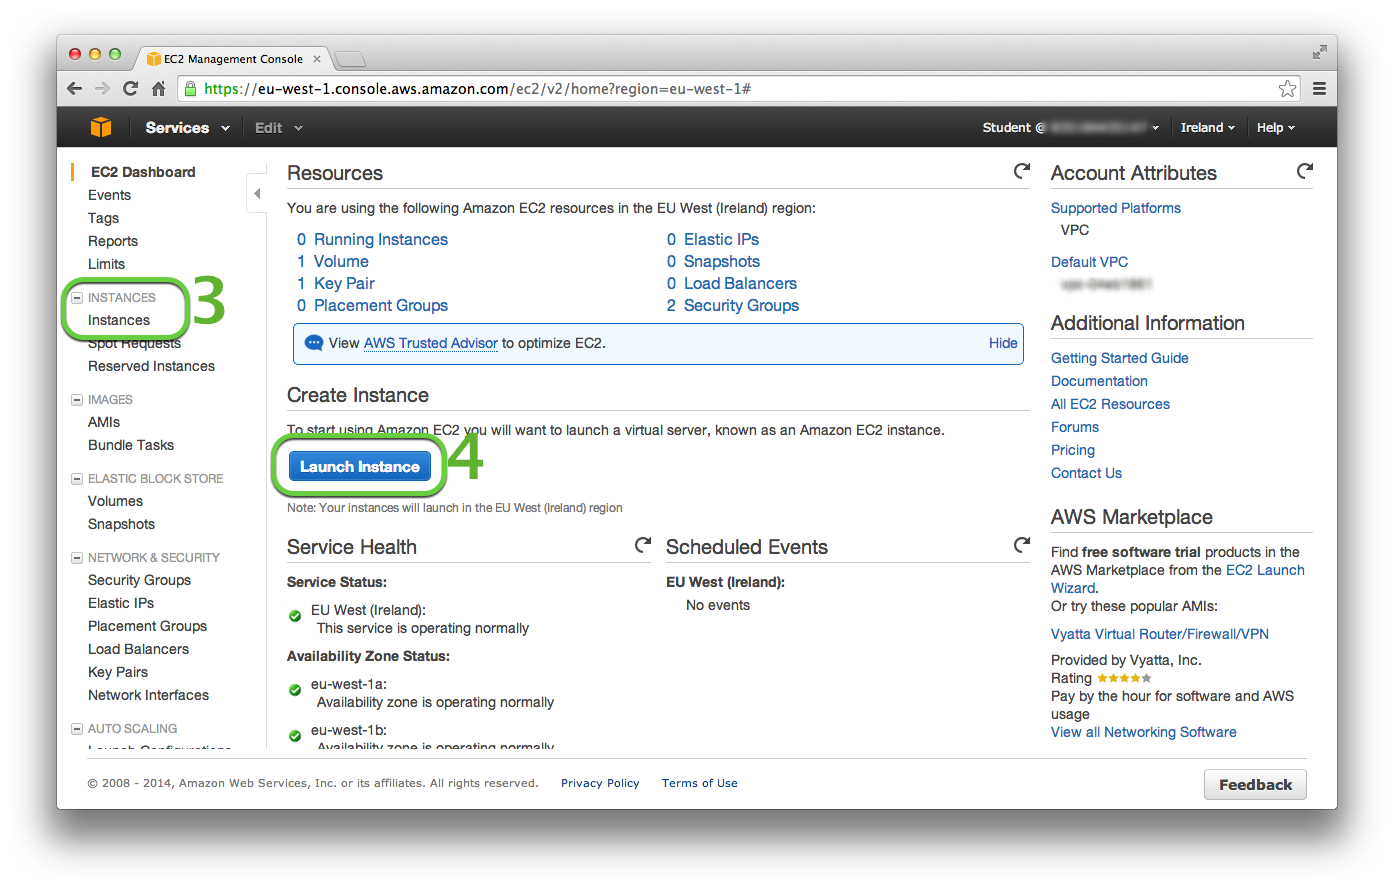
- Go to the EC2 Dashboard.
- Select the INSTANCES -> Instances page.
- Click the Launch Instance button.
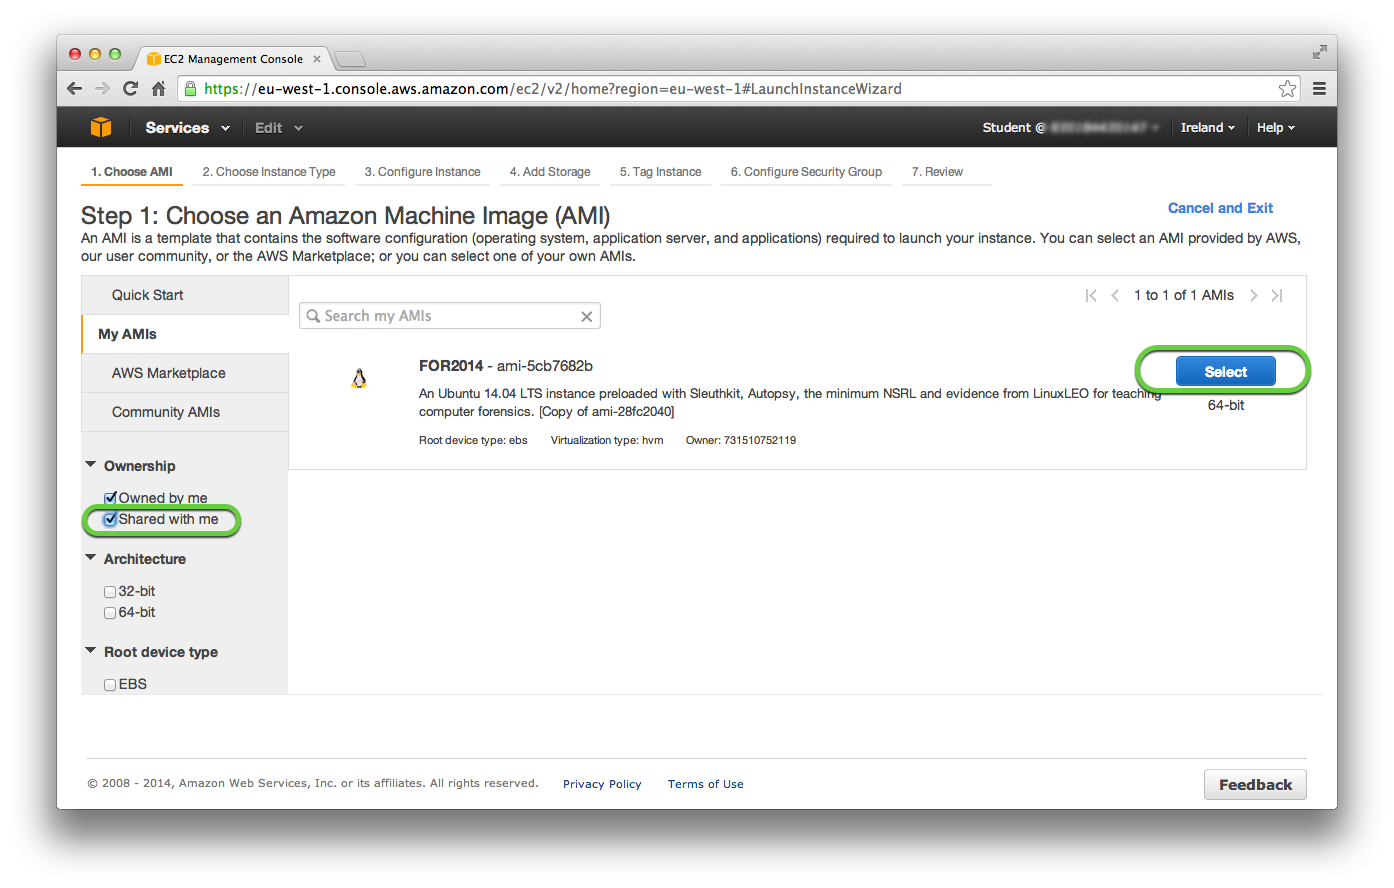
At Step 1 click Select to choose the FOR 2014 AMI - ami-5cb7682b from the My AMIs page (making sure the Shared with Me checkbox is ticked).
At Step 2 choose an instance type you want the AMI to create. Typically for the FOR exercises the t2.micro instance type can be chosen. However other instance types should be useable with the AMI provided they have adequate storage. Note that the larger the instance type the higher the charges that you may incur. Then click Next: Configure Instance Details.

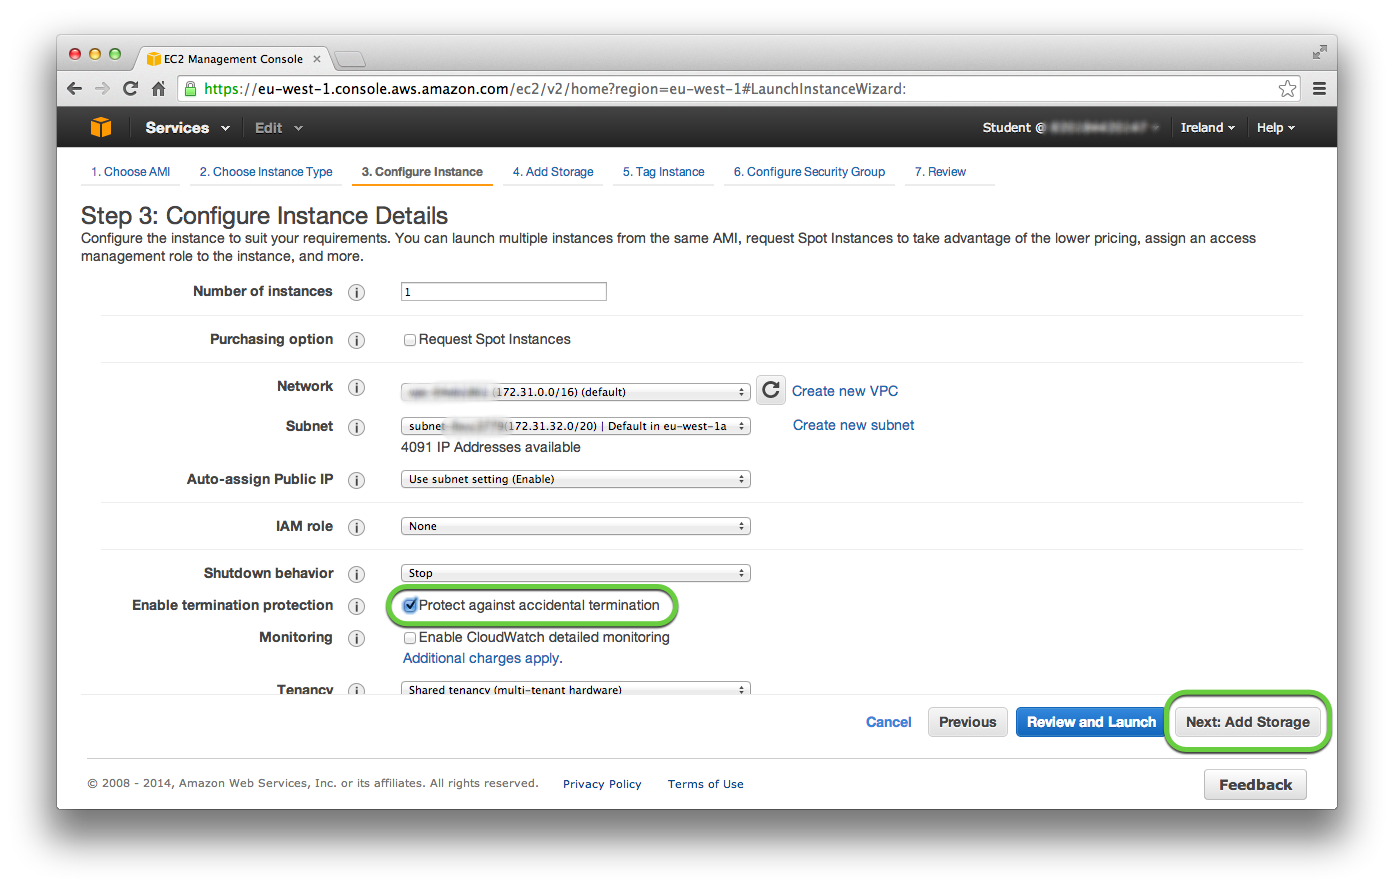
At Step 3 enable termination protection by ticking the check box “Protect against accidental termination”. This will help ensure that your work is not accidentally deleted if you inadvertently terminate your instance before you really want to. Leave the rest of the settings as their defaults. Then click Next: Add Storage.
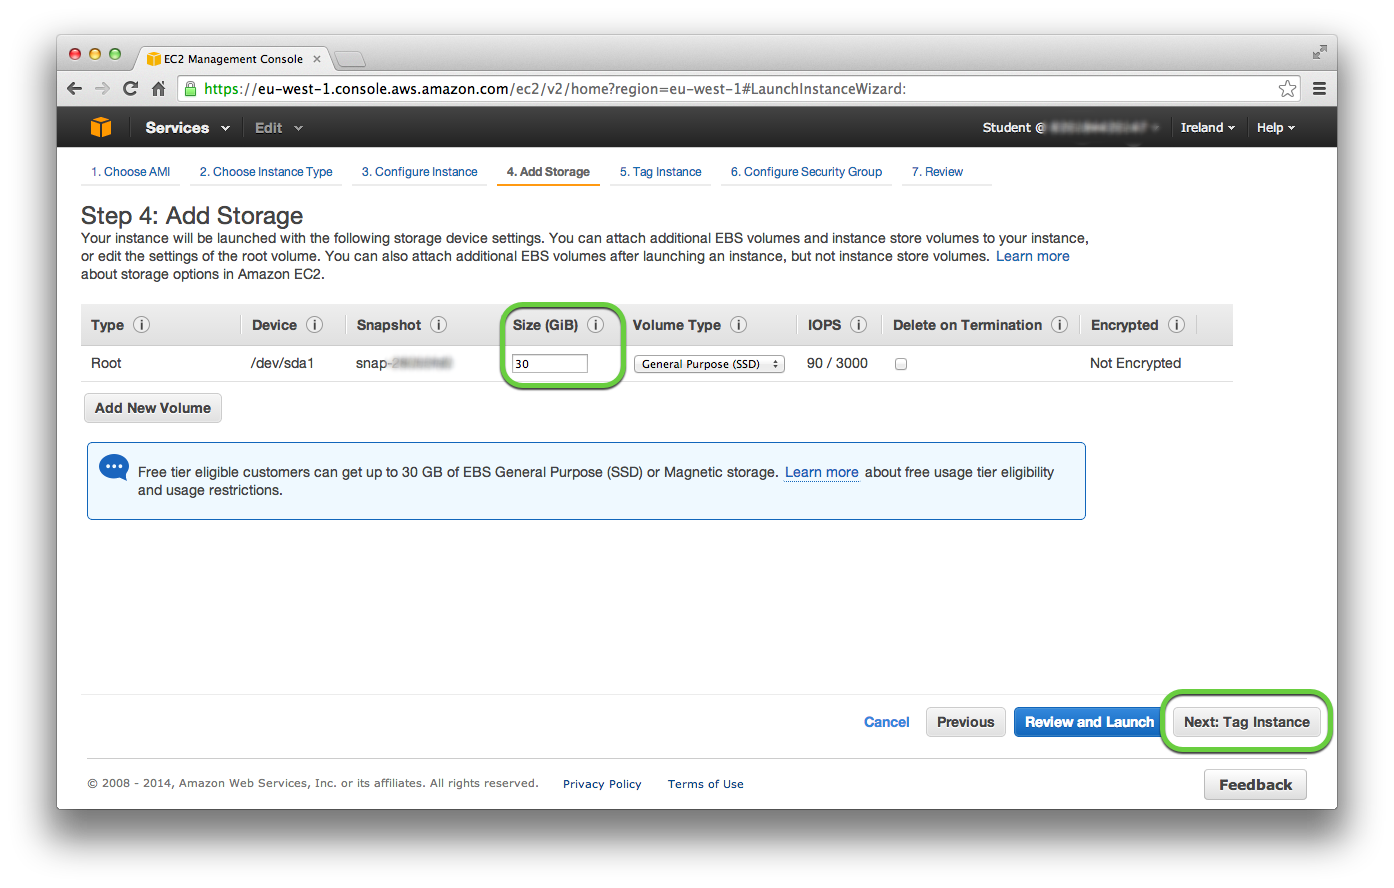
At Step 4 the default volume size should be 30 GB on a default Volume Type of General Purpose (SSD). Do not reduce the volume size as the AMI FOR 2014 AMI - ami-5cb7682b requires 30 GB. Then click Next: Tag Instance.
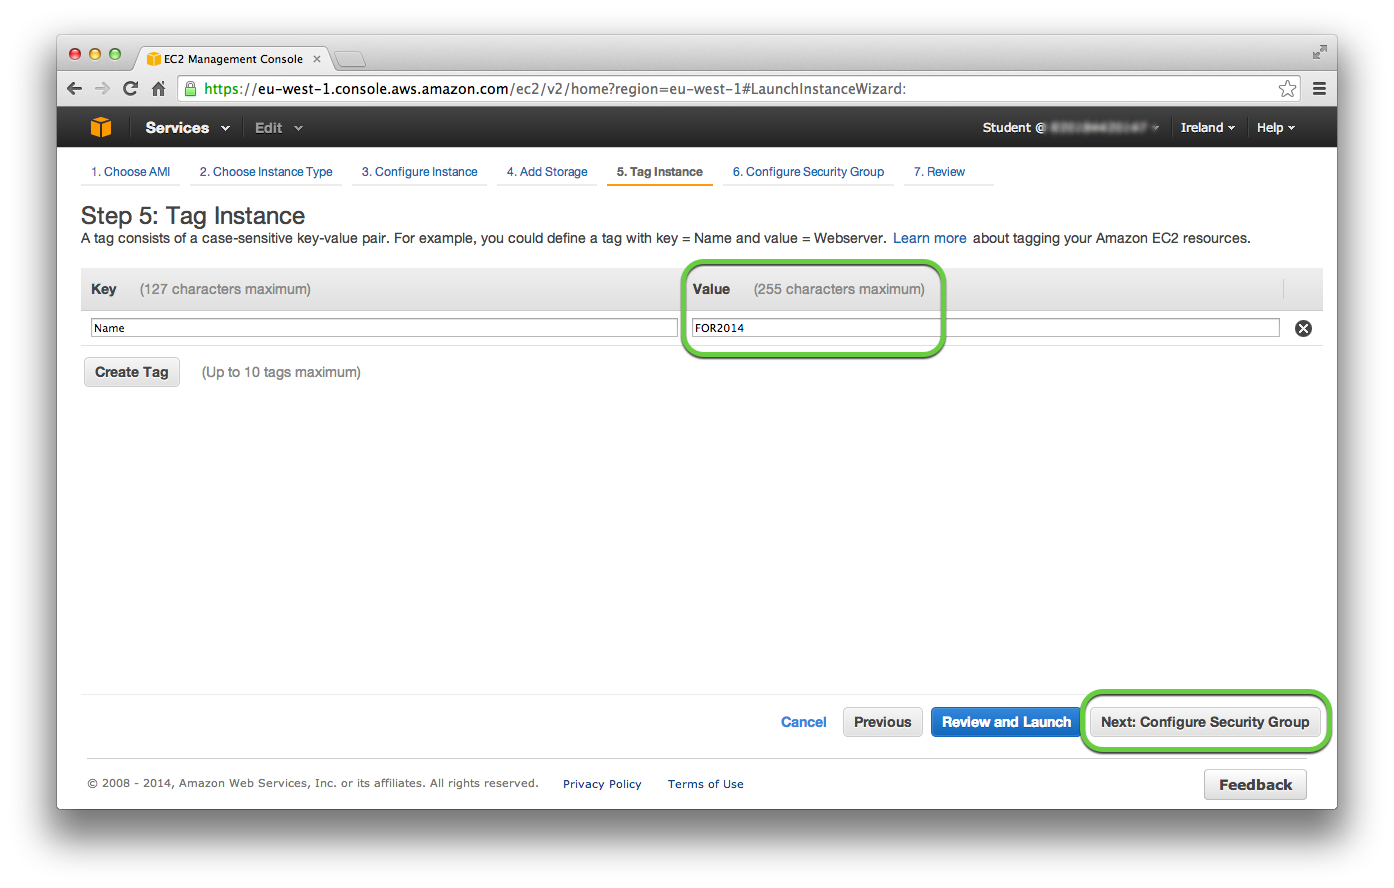
At Step 5 create tags for the instance including the Name tag. Enter “FOR2014” (without the quotes) into the Value field for the Name key. Then click Next: Configure Security Group.
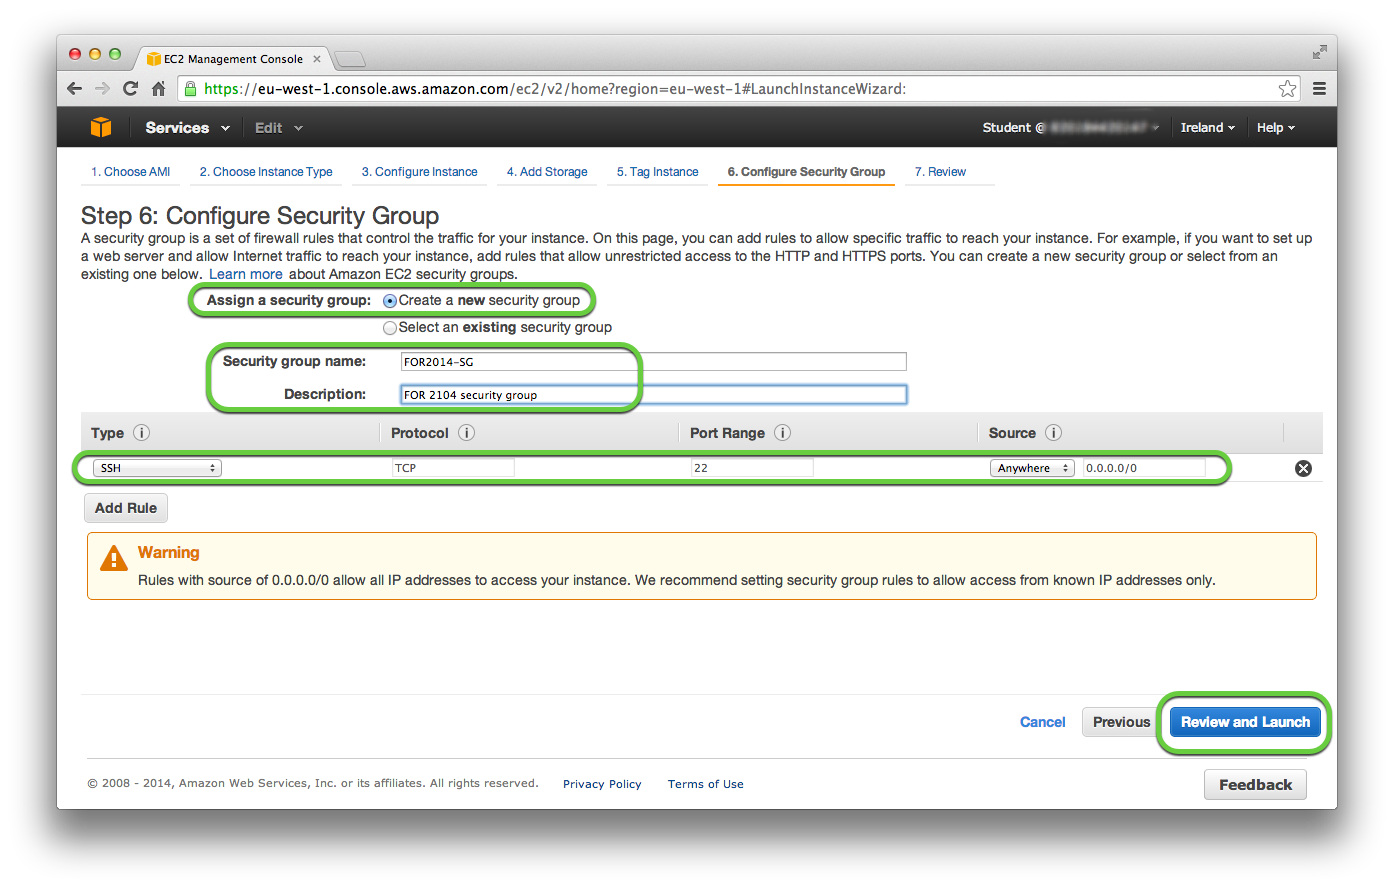
At Step 6 create a new security group. Enter “FOR2014-SG” (without the quotes) into the Security group name field. Enter a description into the Description field. Leave the default rule (type SSH, protocol TCP, port range 22 and source Anywhere). There will be a warning about the source being 0.0.0.0/0. Ignore this for the moment. As we have no control over the IP addresses of the classroom computers we do not want to specify an IP address as the source in case we get locked out of the instance when accessing it via SSH. Then click the Review and Launch button.
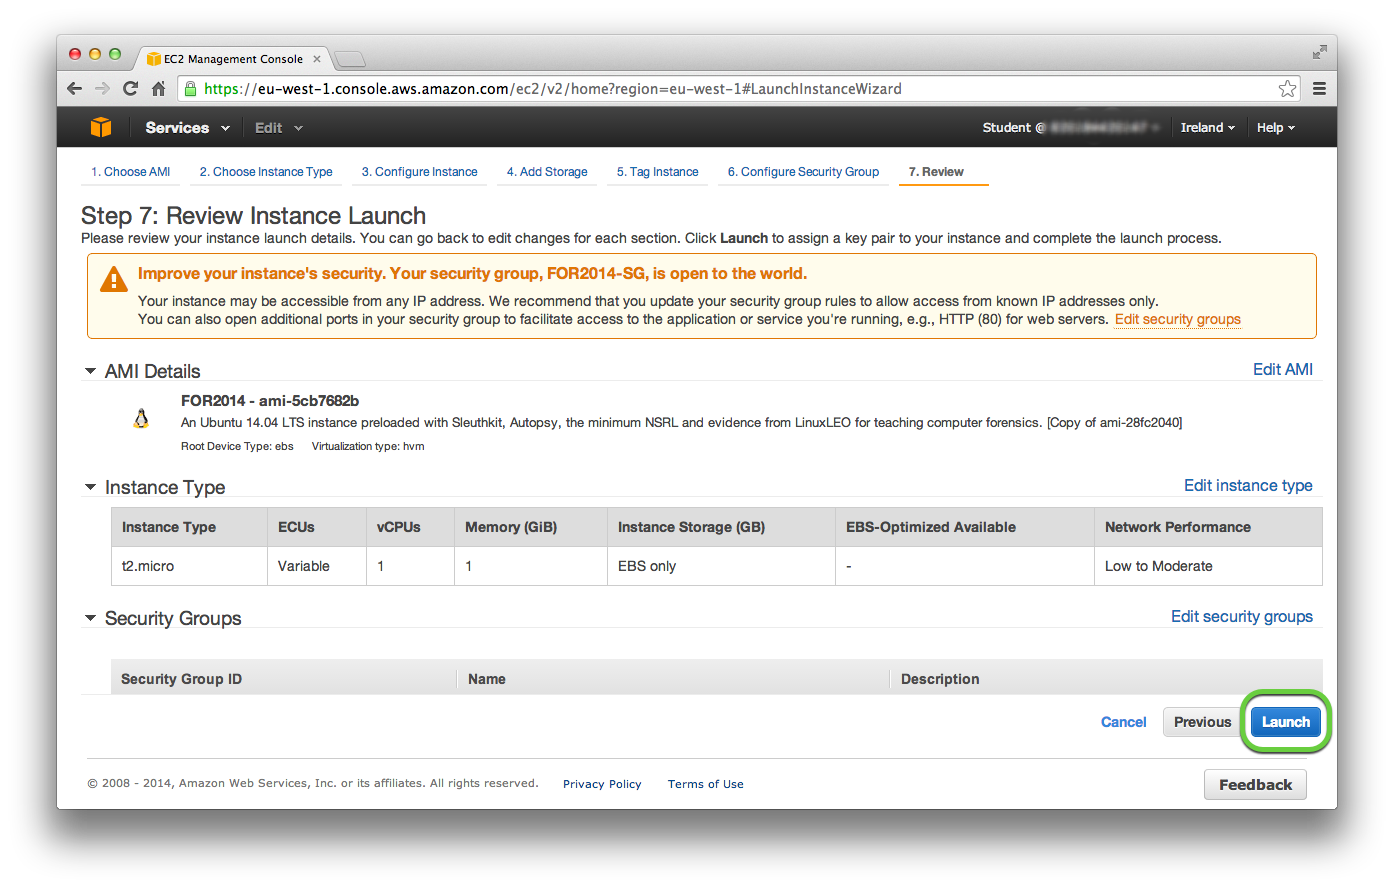
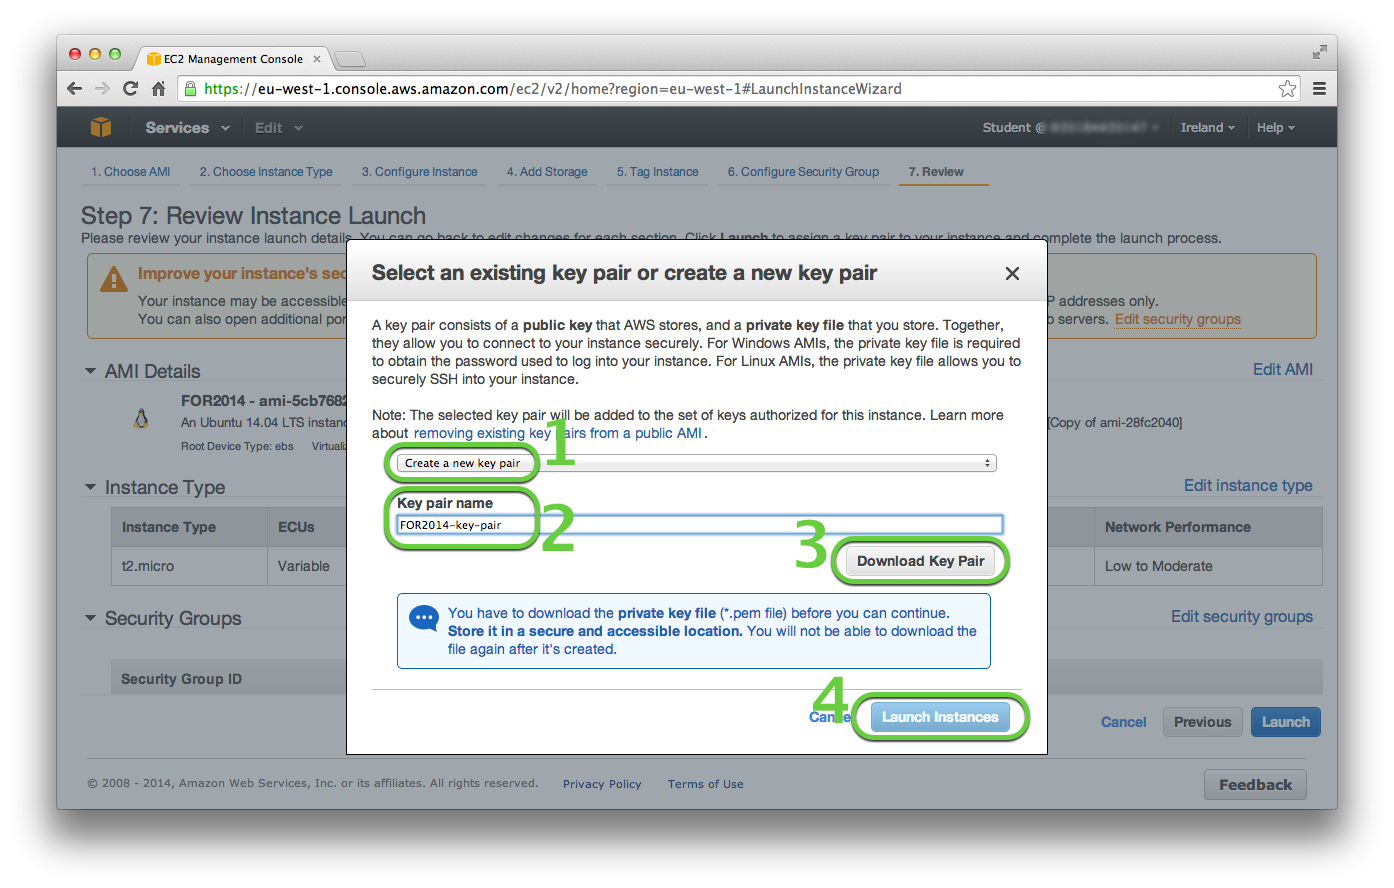
At Step 7 review the settings for the instance. If they are acceptable click the Launch button. Another warning regarding the access to the instance from any IP address will be display. Again ignore the warning at this time.
A splash box will appear asking you to “Select an existing key pair or create a new key pair”.
- Select Create a new pair.
- Enter “FOR2014-key-pair” (without the quotes) into the Key pair name field.
- You must download the key pair once it is created. You will need the key pair on every computer you wish to use to access the instance. Therefore store the key pair somewhere that is accessible so that you can transfer the key pair to any other computers you are going to use. If you are creating the key pair and downloading it on to the classroom computer make sure you copy it so that you can access it after the class is over. You will not be able to access the instance without the key pair from another computer once you have left the class. Click the Download Key Pair button to download the key pair.
- Once you have downloaded the key pair and have it stored in a safe accessible place click the Launch Instances button to create and launch the FOR2014 instance.
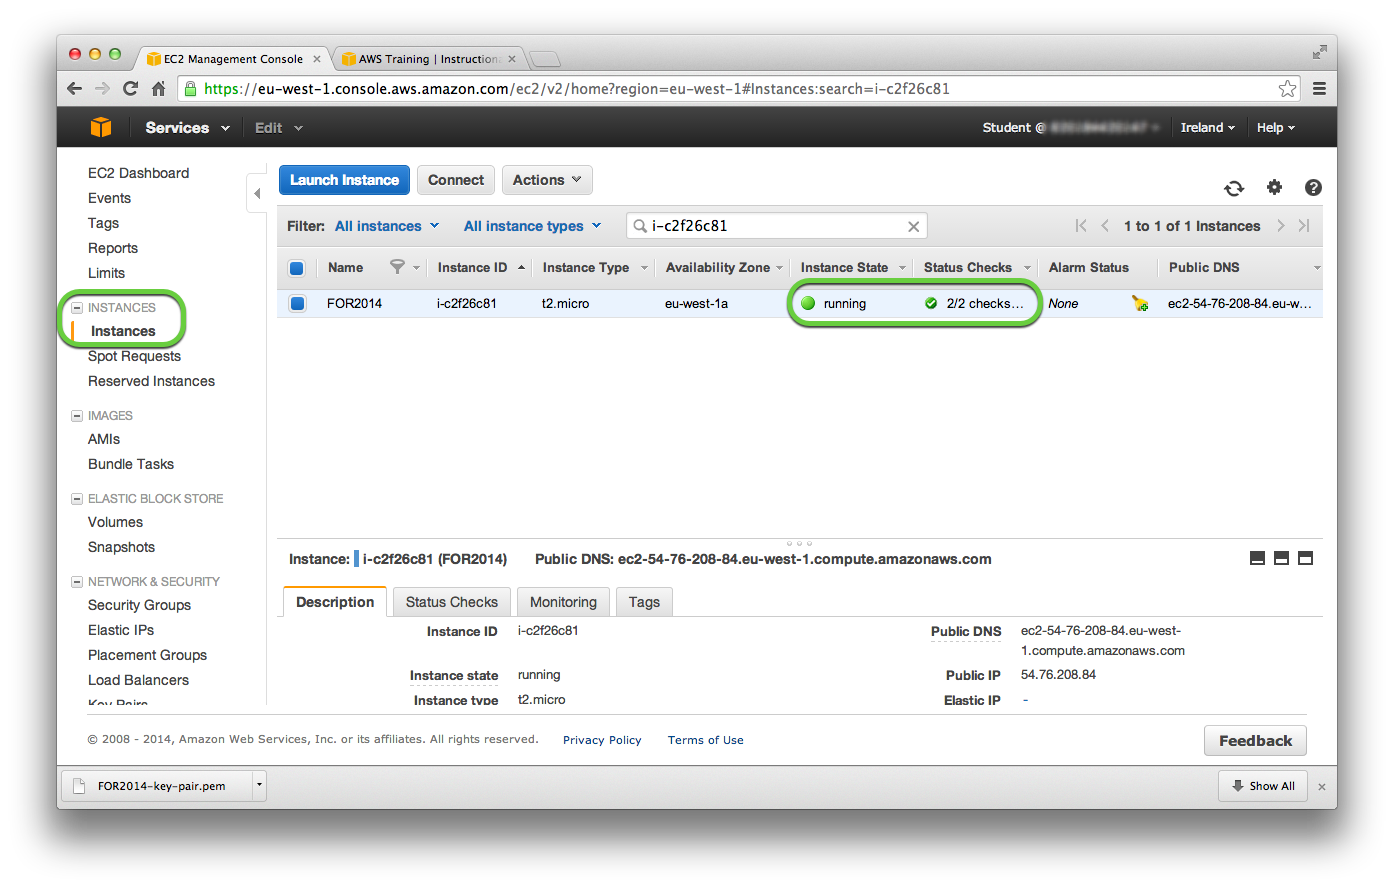
Return to the EC2 INSTANCES -> Instances page to monitor the instance starting. Once the Instance State is running and the Status Checks show 2/2 then instance will be available for access.
Accessing the FOR2014 EC2 Instance Via SSH
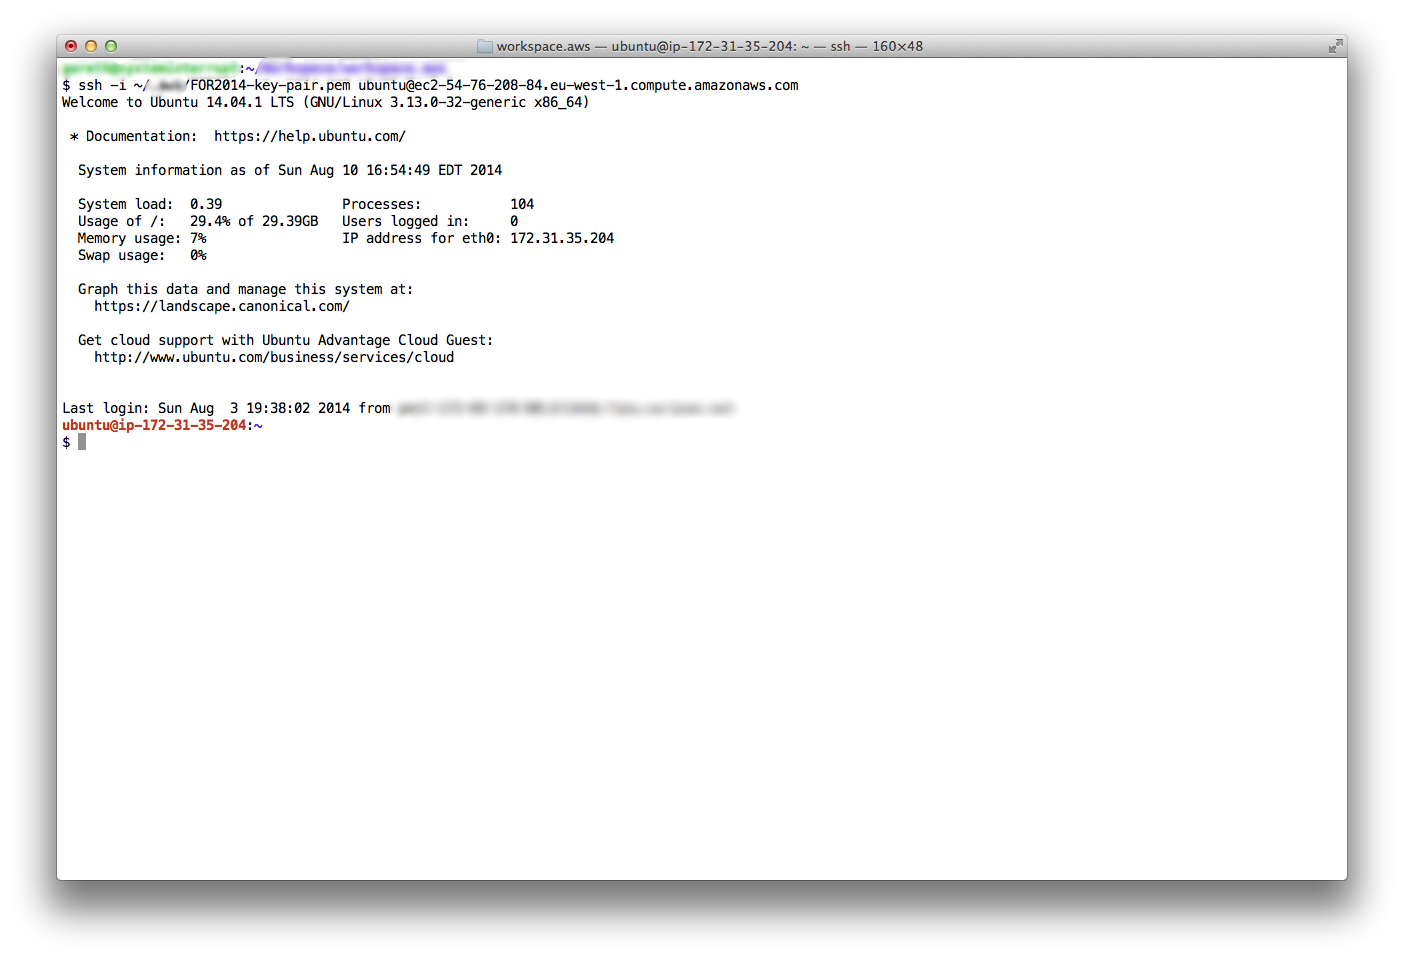
On the classroom Mac open the Terminal application (or on your own computer open a command line terminal or launch your SSH application). Before you attempt to log into the EC2 instance you have created make sure you know:
- The location of the key pair you created and downloaded, FOR2014-key-pair;
- The public DNS URL for the instance which is found on the EC2 INSTANCES -> Instances page.
To login into the EC2 instance you have created for the exercises type:
ssh -i {path-to-key-pair}/FOR2014-key-pair ubuntu@{instance-Public-DNS-URL}
The first time you log into the instance you will have to confirm that you trust the instance.

Once you have successfully logged in you will be at the command line within the EC2 instance.
Incorrect Key Pair Permissions
If you have not limited the key pair permissions to be accessible only by the local user the ssh connection will be terminated.
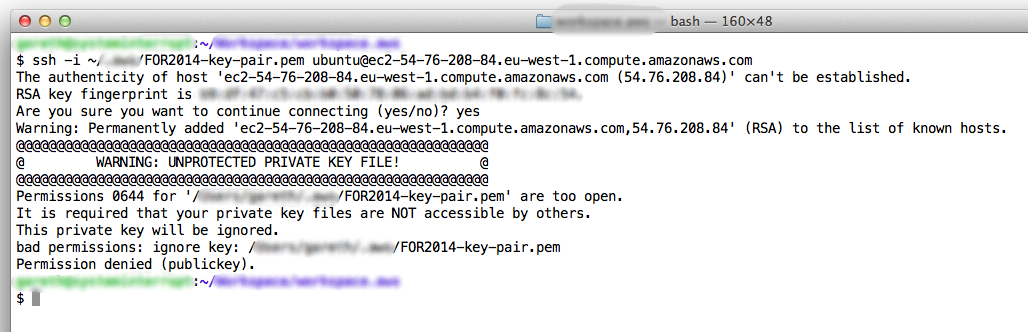
To set appropriate permissions for the key pair type:
chmod 400 {path-to-key-pair}/FOR2014-key-pair
Additional Posts
I have written additional posts that give more detail on the different aspects associated with using the AWS environment for my particular course. In the Using Amazon Web Services in Teaching post I give an overview of the AWS environment I created for my course, shown in the figure below.

- In Setting Up Sleuthkit and Autopsy on an AWS EC2 Instance I describe how I create a master EC2 instance that holds the software and data for the exercises.
- In Creating an AMI for Classroom Use I outline how I created an AMI for sharing with the students.
- [This post] The instructions Creating and Accessing the FOR2014 EC2 Instance for the FOR Course detail how the students should create an EC2 instance from the AMI.
- The instructions Accessing Autopsy v2 on the FOR2014 EC2 Instance detail how to configure Autopsy on the FOR2014 EC2 instance for access from the student’s local computer.