[ This is a reposting of my teaching blog post previously hosted on http://users.ox.ac.uk/~coml0454.
NOTE: I no longer teach at University of Oxford and this is a description of how I used to teach the course.]
Summary
In this post I describe how to create an Amazon Machine Image (AMI) from a customized Amazon Web Services (AWS) Elastic Compute Cloud (EC2) instance. The AMI allows software and data to be prepackaged and distributed to students for use in classroom exercises.
This post is a follow on to my Using Amazon Web Services in Teaching and Setting Up Sleuthkit and Autopsy on an AWS EC2 Instance posts. This post covers the creation of the AMI from the master EC2 instance, labeled “2” in the figure below.

Background
The forensics (FOR) module I teach on the Software and Systems Security programme has exercises that allow the students to use cloud computing resources to perform forensic analysis. In the exercises the students use the Linux command line to investigate and analyze forensic evidence. By hosting the exercises on AWS the students experience first-hand the flexibility offered by cloud computing resources.
Introduction
The EC2 instance is made with an Elastic Block Storage (EBS) volume that contains the software applications and the data that are needed for the exercises. I create and publish an AMI from that instance. The students then create their EC2 instances from the AMI. The EC2 instance is created and loaded with data loaded as described here. The EC2 instance must be secured and the keys removed from it before the AMI is created and published.
Take a Snapshot of the Instance’s EBS Volume
Before securing the instance I made an EBS snapshot so I could roll back and start again, if necessary. I followed the instructions here to create the snapshot using the management console.
Secure the Instance
To secure the EC2 instance before making the AMI I followed the guidelines here. Additional articles on securing AMIs can be found here and here. I logged into the instance with two ssh sessions so that if one was lost I still had access to the instance. This also enables the complete deletion of .bash_history. Using the 1st ssh session I ran through the following tasks to secure the instance.
- In the Ubuntu-based instance password-based logins for root are already disabled in /etc/ssh/sshd_config.
- Disable root access with:
sudo passwd -l root - Remove SSH Host Key Pairs with:
sudo shred -u /etc/ssh/*_key /etc/ssh/*_key.pub - Edit /etc/ssh/sshd_config to include “UseDNS no”.
- Remove authorized keys with:
sudo shred -u /root/.ssh/authorized_keys ~/.ssh/authorized_keys - Log out of the 1st ssh session. Then in the 2nd ssh session run:
sudo shred -u /root/.bash_history ~/.bash_historyto delete the .bash_history created when the 1st ssh session closes. Log out of the 2nd ssh session. Stop the instance.
Create an EBS-backed AMI from the Instance
The guidelines for creating an Amazon EBS-Backed Linux AMI are here. I used the management console to create an AMI based on the EC2 instance.
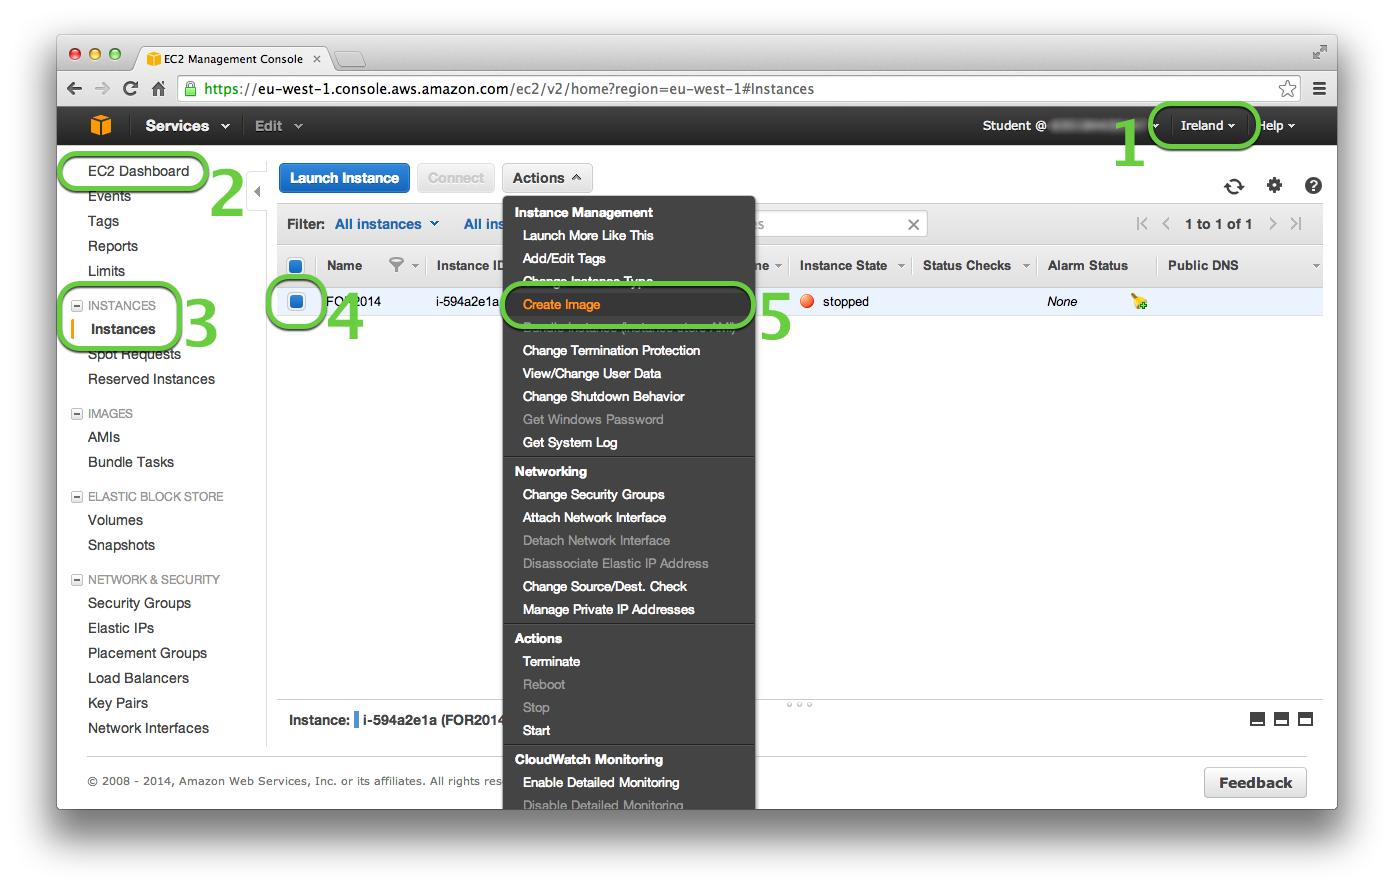
- Select the region you have the EC2 instance stored in.
- Go to the EC2 Dashboard.
- Select the INSTANCES -> Instances page.
- Select the EC2 instance to be converted into an AMI.
- Select Create Image from the Actions drop down list.
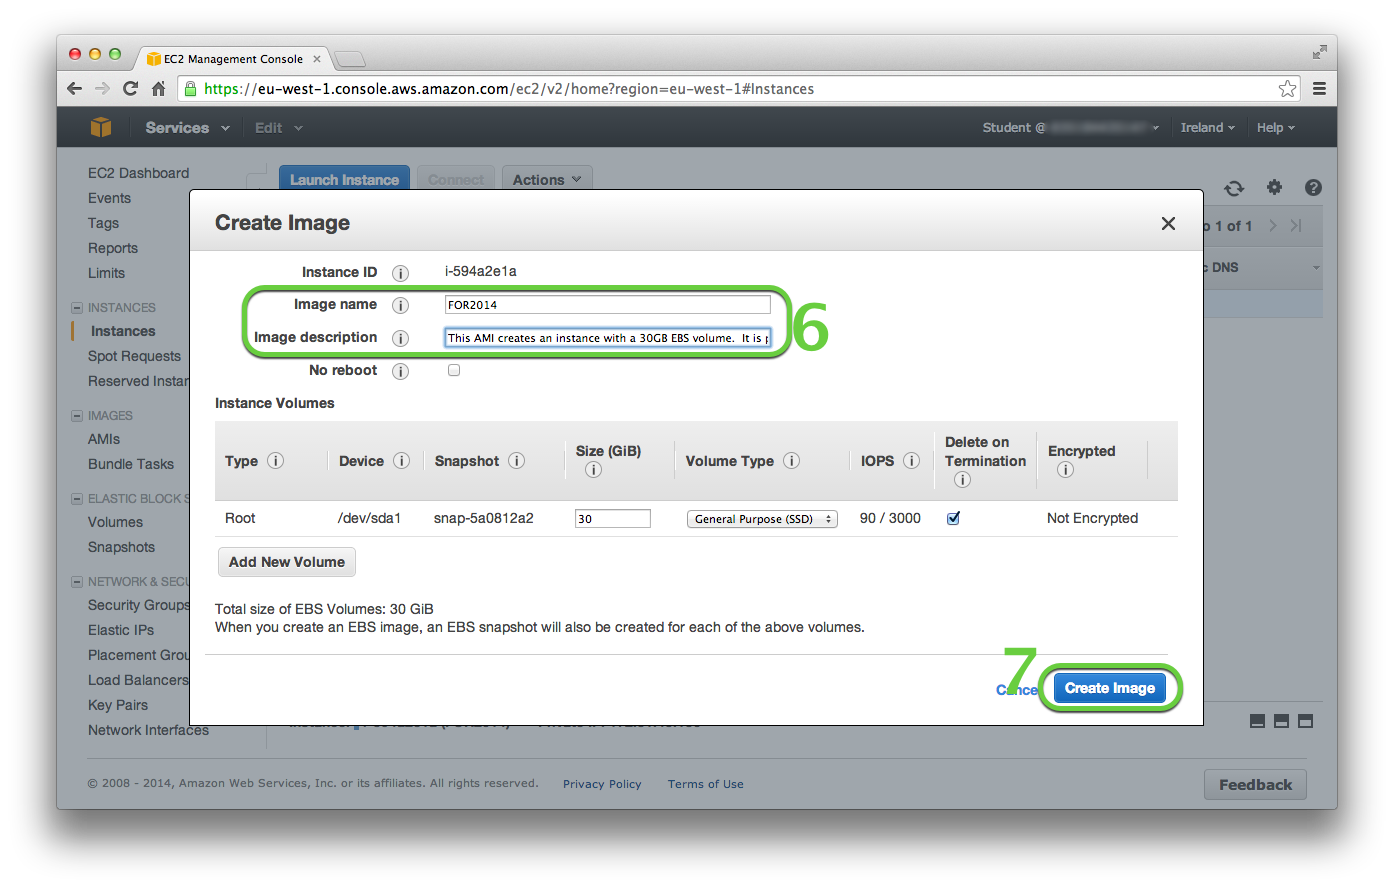
- In the splash box enter a name for the image into the Image name field. Enter a description into the Image description field.
- Then click Create Image.
Cleaning Up
Once you have deleted the keys from the EC2 instance used to create the AMI you will no longer be able to log into it. So I terminated the EC2 instance to delete it. In my case the EBS volume was protected against deletion on termination of the instance so I also had to delete the associated EBS volume manually.
Publishing The AMI Privately
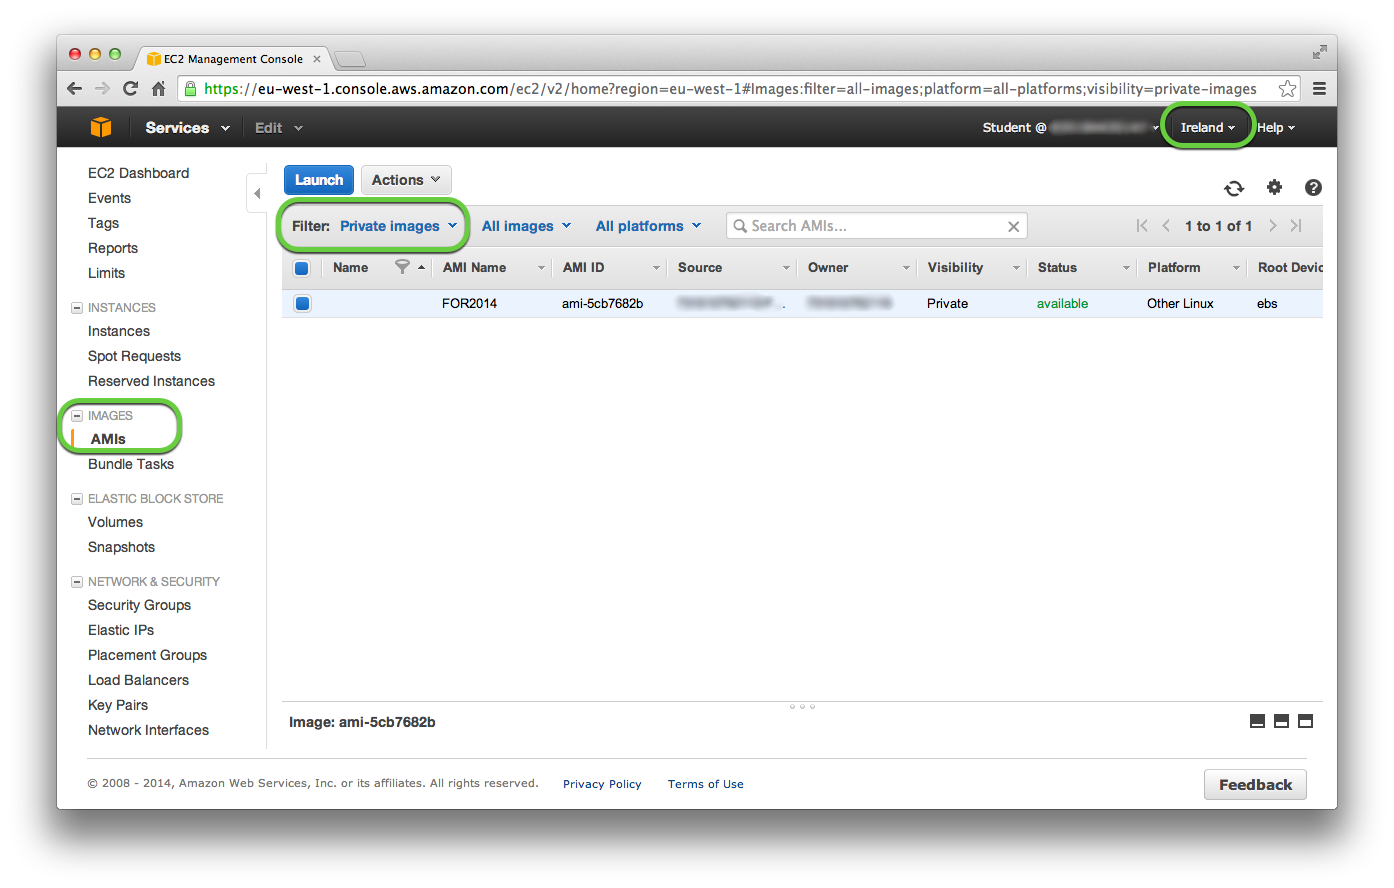
To publish the AMI privately, use the EC2 Dashboard by going to the Images -> AMIs page, select the AMI you wish to share, select the Permissions tab. Click the Edit button and enter the AWS Account Numbers for those accounts you want to allow access to the AMI.
Those accounts you have shared the AMI with will find the AMI listed with the Filter set to Private Images on their Images -> AMI page in the region that the AMI was shared from.
To allow others to launch an AMI in another region you have to copy the image into that region. To copy the AMI to a different region, select Copy AMI from the Actions drop down list on the INSTANCES -> Instances page; choose the destination region and include a description. This will create a new AMI ID for the copied AMI.
Testing Shared AMI
I tested an instance created from the privately shared AMI to ensure that it functioned correctly. I tested the AMI using another account that had been given permissions to access the AMI that I had created. In addition, I ensured that the only keys in the instance were those from the test account by running the following command and inspecting the results:
sudo find / -name "authorized_keys" -print -exec cat {} \;
Additional Posts
I have written additional posts that give more detail on the different aspects associated with using the AWS environment for my particular course. In the Using Amazon Web Services in Teaching post I give an overview of the AWS environment I created for my course, shown in the figure below.

- In Setting Up Sleuthkit and Autopsy on an AWS EC2 Instance I describe how I create a master EC2 instance that holds the software and data for the exercises.
- [This post] In Creating an AMI for Classroom Use I outline how I created an AMI for sharing with the students.
- The instructions Creating and Accessing the FOR2014 EC2 Instance for the FOR Course detail how the students should create an EC2 instance from the AMI.
- The instructions Accessing Autopsy v2 on the FOR2014 EC2 Instance detail how to configure Autopsy on the FOR2014 EC2 instance for access from the student’s local computer.