[ This is a reposting of my teaching blog post previously hosted on http://users.ox.ac.uk/~coml0454.
NOTE: I no longer teach at University of Oxford and this is a description of how I used to teach the course.]
Summary
In this post I outline how to install and use Sleuthkit to conduct computer forensic analysis on an Amazon Web Services (AWS) Elastic Compute Cloud (EC2) instance. The EC2 instance is used in classroom exercises by students using the Linux command line to investigate and analyze forensic evidence.
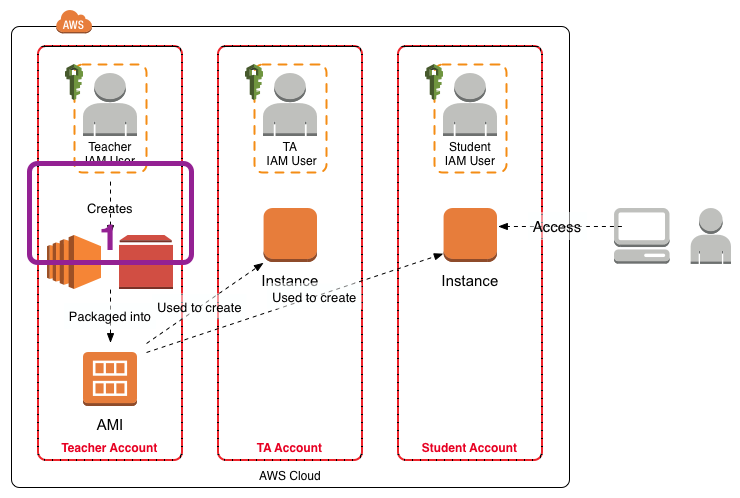
This post is a follow on to my Using Amazon Web Services in Teaching post. This post covers the creation of the master EC2 instance for use in the teaching environment, labeled “1” in the figure below.

Background
Cloud infrastructure offers the ability to rapidly obtain additional computing resources and storage without having to purchase the physical computers and storage yourself. The additional cloud computing resources and storage can be used for a specific task and then released. Computer forensic investigations are often characterized by the need to store large amounts of data and then analyse it rapidly. Therefore computer forensic analysis serves as a good demonstration of what cloud computing can offer.
I teach the forensics (FOR) module on the Software and Systems Security programme. The week long module includes a number of classroom exercises associated with the extraction and analysis of computer system artifacts. The assignments may also involve the extraction and analysis of computer system artifacts. To encourage understanding of the extraction and analysis process the exercises use Linux and Sleuthkit utilities run from the command line. Linux and Sleuthkit have been chosen as there are no licensing issues associated with their distribution.
Create An AWS EC2 instance
In this case I have created an Ubuntu 14.04 LTS instance. In this case I used the AMI “Ubuntu Server 14.04 LTS (HVM), SSD Volume Type - ami-864d84ee”. I set the instance parameters including the type, protection against accidental termination, 30GB general purpose SSD volume, tags, security group and a key pair. The Ubuntu instance creates an 30GB EBS volume. The security group allows access from any IP address to port 22.
Tags:
Name: FOR2014
User: ubuntu
Connect using SSH
Launch the instance and log in via ssh.
ssh -i <YOUR_KEYS.pem> ubuntu@<INSTANCE_PUBLIC_DNS_NAME>
Don’t forget to use your keys and remember that the username is ubuntu.
Enable The UFW Firewall
Once you have logged in to the instance use the ufw firewall to secure the instance. REMEMBER to allow ssh before enabling the firewall.
sudo ufw allow ssh
sudo ufw enable
sudo ufw status
Set A Color Prompt
I like to turn on the color command line prompt so I tell easily if I’m at my local command line or have accessed a remote host. Edit .bashrc and uncomment the appropriate line. In this case I have set the system name color to red (01;31) and added a carriage return (\n) so the $ prompt appears on a new line.
force_color_prompt=yes
PS1=’${debian_chroot:+($debian_chroot)}[\033[01;31m]\u@\h[\033[00m]:[\033[01;34m]\w[\033[00m]\n$ '
To force the immediate use of the new prompt, at the command line type:
source .bashrc
Update & Upgrade The Ubuntu Packages
Update the package repositories and upgrade the instance packages to the latest versions. This is quite fast as the AWS region has its own Ubuntu package repositories.
sudo apt-get -y update && sudo apt-get -y upgrade && sudo apt-get -y dist-upgrade
sudo reboot
Set The Instance Local Time
Set your instance’s local time, as appropriate, using:
sudo dpkg-reconfigure tzdata
Install Sleuthkit
Install Build Essential Tools & Headers
sudo apt-get -y install build-essential linux-headers-$(uname -r)
sudo apt-get autoremove
Install Sleuthkit Dependencies
cd ~
sudo apt-get install zlib1g-dev libssl-dev libncurses5-dev
sudo apt-get install libcurl4-openssl-dev libexpat1-dev libreadline-gplv2-dev
sudo apt-get install uuid-dev libfuse-dev bzip2 libbz2-dev git
sudo apt-get -y install automake1.9  autoconf libtool
Install libewf
Download libewf from Google Drive.
wget -v https://googledrive.com/host/0B3fBvzttpiiSMTdoaVExWWNsRjg/libewf-20140608.tar.gz
Once the libewf tarball is downloaded:
tar -xvf libewf-20140608.tar.gz
cd libewf-20140608/
./configure
make
sudo make install
Install AFFLIB
cd ~
git clone git://github.com/simsong/AFFLIBv3.git
cd AFFLIBv3/
./bootstrap.sh
./configure
make
sudo make install
Install Sleuthkit
cd ~
git clone git://github.com/sleuthkit/sleuthkit.git
cd sleuthkit
./bootstrap
./configure
make
sudo make install
Download the NSRL from NIST
As Autopsy can be configured to use the NIST National Software Reference Library (NSRL), download and install the NSRL before installing Autopsy. The NIST NSRL download page is here. The full NSRL is over 18GB which will use a significant portion of our 30GB EBS volume. So in this instance we just download the reduced set which only uses 4.7GB. (There is also a unique set that occupies an even smaller amount of space.)
In the commands detailed below the zip file is downloaded into ~/NSRL as a temporary location for the zip. The contents of the zip are unzipped into ~/NSRL. Then the zip is deleted.
cd ~
mkdir NSRL
cd ~/NSRL
wget http://www.nsrl.nist.gov/RDS/rds_2.45/rds_245m.zip
md5sum rds_245m.zip
gunzip -c rds_245m.zip > NSRLFile.txt
chmod -R 444 NSRLfile.txt
rm RDS_245m.zip
Install Autopsy v2
Autopsy can be downloaded from github or from http://www.sleuthkit.org/autopsy/v2/download.php. Here it is downloaded from github. For this instance I create a folder evidence_locker in the user ubuntu home directory for Autopsy to use.
cd ~
mkdir evidence_locker
git clone -b autopsy-2 git://github.com/sleuthkit/autopsy.git
cd autopsy
./configure
Using Sleuthkit
Upload Evidence
One way of organizing the evidence is to create a directory for evidence with subdirectories for different cases. Any output from the analysis can be stored in the associated evidence directory. In the instance the evidence directory is place at: ~/evidence.
A special mount point is needed to mount the images for analysis via the file system. The mount point separates evidence’s file system system for the host file system where the evidence processing is performed. A mount point is created in the instance at /mnt/analysis.
cd ~
mkdir evidence
sudo mkdir /mnt/analysis
Now copy the evidence from its current location into ~/evidence on AWS instance. For example, using scp to copy a local directory holding previously captured forensic images on your local machine:
scp -vr -i <YOUR_KEYS.pem> <LOCAL_EVIDENCE_DIRECTORY> ubuntu@<INSTANCE_PUBLIC_DNS_NAME>:/home/ubuntu/evidence/
Once the evidence is copied into the instance it should be set to read-only access using the chmod command. For example:
chmod 444 able2.tar.gz
Use Sleuthkit To Analyze Evidence
Once the evidence files have been uploaded return to the AWS instance to start the analysis using Sleuthkit. For example to identify and extract all the files in a forensic image use sorter:
cd ~
mkdir workspace
cd ~/evidence
sorter -d ~/workspace/ -f <FILE_SYSTEM_TYPE> -md5 -m <MOUNT_POINT_OF_IMAGE> -s <FORENSIC_IMAGE_FILE>
As the analysis may take some time it is prudent to use screen to create a shell within which you can run the analysis commands, such as sorter. That way, you can detach from the screen shell and log out of the AWS instance. You can log in later and use screen to reattach the shell that is being used for the analysis.
Linux Directory Structure
As this instance has the evidence and the NIST NSRL preinstalled the evidence and NSRL directories are under the user ubuntu home directory. The analysis mount point has been placed in the /mnt/analysis/ directory. An explanation for the Ubuntu Linux directory tree structure is here.
Additional Posts
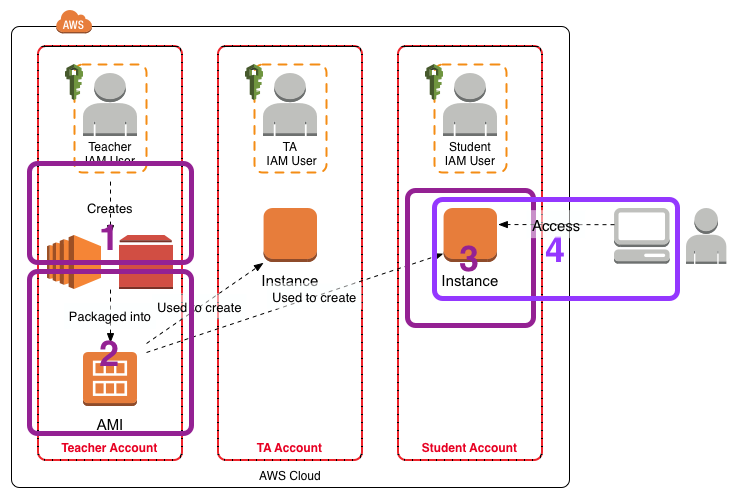
I have written additional posts that give more detail on the different aspects associated with using the AWS environment for my particular course. In the Using Amazon Web Services in Teaching post I give an overview of the AWS environment I created for my course, shown in the figure below.

- [This Post] In Setting Up Sleuthkit and Autopsy on an AWS EC2 Instance I describe how I create a master EC2 instance that holds the software and data for the exercises.
- In Creating an AMI for Classroom Use I outline how I created an AMI for sharing with the students.
- The instructions Creating and Accessing the FOR2014 EC2 Instance for the FOR Course detail how the students should create an EC2 instance from the AMI.
- The instructions Accessing Autopsy v2 on the FOR2014 EC2 Instance detail how to configure Autopsy on the FOR2014 EC2 instance for access from the student’s local computer.